Friday 31 January 2014

Inspired by Pam for Paperartsy - my very first scrapbook page!

I always said I wouldn't scrap book...but then this week Pam Thorburn has been Guest Designer at Paperartsy and showed us some fabulous mixed media scrap book pages.... and the challenge was set!

As lots of you know (especially if you are kind enough to look at my "other" blog, photosbyh, I LOVE Kew Gardens. So it was obvious what I would choose as my source...

 so I gathered some supplies, the paper is from one of Tim Holtz's paper stacks (I forget which), my photos, which I matted onto black card, some die cut leaves (thanks Sam!) and some Prima flowers and leaves.
 I brayered some Fresco's over my paper... scary moment! - I used a few... can't quite remember which..Guacamole, Limelight Honey Dew , Tango Yellow Sunshine I think.
some grunge paste stencilling and paint stencilling. I stamped some leaves in archival ink round the edges (seem to have forgotten the photo for this stage) but it was very in your face, so I knocked it back with some watered down Fresco - Guacamole and Honey Dew) with a babywipe


Decided on the layout, and then time to start fixing things down - another scary moment!

Added the text by Darcy for Paperartsy.. not quite placed right, as part of it hasn't come out properly as I caught the grunge paste...
I love this photo - it's one of the galleries in the gardens, and I was so lucky to be there on a sunny autumn day in 2012 and caught the reflection of the trees in the glass - perfect timing!  I've checked every time I've been again since, and it just won't happen again for me!

Added some metal and resin flowers to the centres - the resin is painted with Honey Dew and then has Ruby and Renaissance TG brushed over.

Well, I think it's ok for a first effort - I may well do some more, this is the start of a whole new venture for me...!! Thanks Pam and Paperartsy for pushing me outside my comfort zone and getting me started!

Wednesday 29 January 2014

DragonsDream - TIO #159 - F and Green

Hi, it is my team-mate May's turn to choose the TIO letter and theme this fortnight for you - and it's F and green.Don't forget we need you to make a tag, and use real stamps!

I had been using some green Fresco paint in a journal page and had some left over on my craft mat, so as always, used it on the next page in the journal... so I decided to use this for my tag base this time - I don't normally do anything other than a standalone tag, but, hey, a change is as good as a rest!

 following the Paperartsy challenges set by Ellen last week, I added some more colour to the page with my brayer
then stencilled some flowers - which is my F word! using Salty Ocean distress ink, and stamped a sentiment from one of Jo Firth Young's Paperartsy stamps
 for the tags, I coloured them with Sage Fresco paint front and half of the back, stamped some script (Paperartsy) in Cornflower blue archival ink and folded them, stapling them "shut".

The main images are stamps from Crafty Individuals, stamped on white card and coloured with my Inktense watercolur pencils, poking them out of my folded tag.

 Edged the tags with Walnut Stain distress ink before fixing them to the pages with doubled sided tape.


Hope you come and play with the Dragons this fortnight!

WOYWW #243 - pens and papers and....

...means Helen's been stash shopping again!!

To be fair, the 12x12 paper at the back I won in a blog giveaway for a prize from Snazzy's, for a journal page I entered a challenge with, but the rest is down to me!


you can't really make out the 12x12 paper (you can see some keys) - but they are by Kaisercraft and are FAB.  The Tim stamps were in the sale, the small Prima pad wasn't... the die is new... the pack of love heart sweets came in the parcel with the goodies - and I've not eaten them yet, since Saturday!!


 but, you ask, she said pens... well following a conversation on twitter the other night, I was alerted to some Sharpie markers in bright colours at a good price from the Post Office - yes, really! - so they kind of fell into my shopping basket.. they're here on the floor, just above my journal  -you may need to enlarge the picture!
wide angle shot of my living room - it's been a while (and not done it before with the new camera - which I'm loving - eek, what a mess!) The pile of cushions are on the little stool  I sit on at the pc.. I need to change this set up!) I grabbed this shot in daylight for a change, just before I left for work on Tuesday morning, but nothing's changed!
and a shot from the doorway into the room - as you can see, not a lot of room to get INTO the room, lol!!

Well, this is neither short nor probably sweet, so I'd better be off before Julia tells me off... thanks for visiting and I'll wish you happy WOYWW as I realise I haven't introduced the post yet, ha ha!!


Monday 27 January 2014

Bubbles - a journal page

Hi, hope your Monday has been good... I've been working on this journal page for a couple of days now, but it didn't feel quite finished, until now..

I started with Fresco paint - not sure but I think it's probably Vanilla...and I've obviously cleaned some red paint off a brush on the page too! I took Finnabair's Bubbles stencil - I knew I'd love it when I saw it - and I was right.... I used Sage Fresco for that.

 Once the paint was dry, I put the stencil back over the bubbles and stamped a Paperartsy script stamp (used Iced Spruce distress ink) into the larger bubbles.

Stamped "create with abandon" randomly across both pages using Cornflower Blue archival ink

Stamped "Lonely Girl" and "Silhouette Script" by Dina Wakely on some Paperartsy (no longer available, hoarding my stock) Crackly Tissue paper
 in black archival.  Tore and trimmed round the images, painted on the back with Sage Fresco so they'd blend into the page better.
 hmmm wonder why the flash didn't ... must read the instruction manual for my camera again!!  - Wanted to create a sort of 'wave' through the bubbles - knew if I used a pen I'd ruin it... then decided Pan Pastels were the way - using the rounded nibbed applicator for this and Bright Yellow Green Shade I "drew" a kind of swirly shape through the bubbles...
My friend Sam sent me some die cuts of the new Tim greenery paper strip recently - and I used a couple here.  One was cut on green paper, the other white which I coloured with Sage Fresco.  Overstamped both with the Paperartsy MN72 splatter and Cornflower Blue ink. Glued them to the pages with Matt Medium....here at the bottom

and at the top - this one across the two pages (I snipped - well ok, tore - them into two) ...so it would meander across both pages.

I think this is finished now... although it probably needs something white on it so I may come back to it again later!

Thanks for looking.

Sunday 26 January 2014

Craft Barn - Quotes and Lyrics - no 2

The Craft Barn challenge announced this morning in their Quotes and Lyrics challenge, was "Silence" or "Dazzle".

Well the only Dazzle I could think of was Razzle Dazzle 'em, from Chicago, but couldn't think how to interpret that on the page... so Silence it was to be then.... I was going to go for a quote rather than a song lyric, and there were lots to choose from... but "the Sound of Silence" was going through my mind whilst I was searching for quotes, so.... Simon and Garfunkel it is then!

 I started by using Spray Mount to fix two pages together to give them some weight against the later layers... then tore some music paper as shown and glued it down.
 painted the page first with watered down Haystack Fresco paint (making it semi translucent, to keep the music partly visible) and then Pumpkin Soup - which is already translucent.  Stamped the Darcy heart vine (Paperartsy) round the whole border and coloured with watercolour Inktense pencil.
Typed out the first verse of The Sound of Silence and stuck it to the pages, then added the larger Darcy heart to the space.

Added some white highlights to the hearts with a white Sharpie marker.

 I seem to have forgotten a decent close up of the words, sorry!! I am sure you know them, though!

Saturday 25 January 2014

Spring Sprung...journal page

Well I eventually got hold of my new stamps today, even though the postman didn't knock but just pushed a card through the door, so I had to go and collect them from the sorting office....still, I got them..

I had some paint on a journal page, in random splodges, that needed attention!
 Once I'd got colour on my page, applied with both brayer and brush and cut 'n'dry foam... I stamped the background from Tim's Papillon set, in Cornflower blue archival ink, randomly over the page. (sorry about this photo, the flash wouldn't fire!)
I applied watered down Antarctic paint to knock back the stamping...
Then added some of the new stamps from Spring Sprung and the sentiment from Urban Chic (stamped on tissue paper and blended in with watered Antarctic paint again)
The butterfly I stamped with the Orange Blossom archival, and the grasses with Watering Can.
To finish I added some of the little resting bird dies in amongst the grasses.

Wednesday 22 January 2014

WOYWW 242 - challenge in progress

My workspace this week for WOYWW sees evidence of a challenge I'm entering at the Paperartsy blog and the actual post will appear either immediately below or above this one - depending on whether I get the post written and the pictures downloaded tonight (Tuesday night, at time of writing) or not!

No new stash to show you this week - there is a blog prize on it's way to me that hasn't arrived yet (some Kaisercraft papers) but they're not here so you can't see them!!

So, in an effort to keep this short and sweet, here's my "desk" for you!!

You'll have to check the next/last post for details and close-ups of the cards and do check the Paperartsy blog for the inspiration behind these cards, because Ellen, who is Guest Designing this week, is incredibly talented.

This is the point where I make the usual promises to visit as many of you as I can - sorry I didn't make it to many of you last week, the cold did indeed take hold and it was a stinker, from which I am just about recovered but still full of catarrh!   Anyhow, happy WOYWW to you all, see you very soon...

Tuesday 21 January 2014

Paperartsy - Abstract art inspired by Ellen Vargo

Wow, have we had a treat this week at Paperartsy - the oh-so-talented Ellen Vargo is the new GD - I've followed Ellen's blog for ages and it was with delight that I saw the Sunday post announce her arrival.

Such wonderful abstract art she's created this week too, check them out if you haven't.

I started these cards yesterday, based on her day 2 post and when I stopped last night, with the background partly done, I wasn't at all happy - but carried on regardless tonight, to a finish - and I DO like the results now!! Just shows, you can't always tell until something is finished, if it's worked or not!
 see, too much white space !
 but, adding collage elements and stencilling and more colour, helped.
the finished cards
 and close ups...

as you can see, I used the same main image as Ellen, partly because it's one of my favourites, but mainly because it's a nice open design and goes over the backgrounds so well.

not sure where that annoying blob of black paint on the greeting on this last one, came from!!

Anyhow, this was a great idea, fab backgrounds, Ellen thank you for this weeks projects - hope to try the tag too...

Saturday 18 January 2014

A Julie Ann inspired box for Paperartsy...

This week saw my good twitter buddy Julie Ann announced as the latest Paperartsy Guest Designer - and boy did she come up trumps!  You can see her masterpiece here...  but this is my take on it, which I was inspired to try today now that my cold is finally starting to go... well, at least I don't feel so rough with it!

I started with a soap box that came from Mum's house.. and covered it with several layers of gesso before starting to add colour.

 there's mermaid, and then space cadet, then mixed a bit of both to blend, generally faffed with it .. sanded back, added a bit of French Roast in the sanded areas.
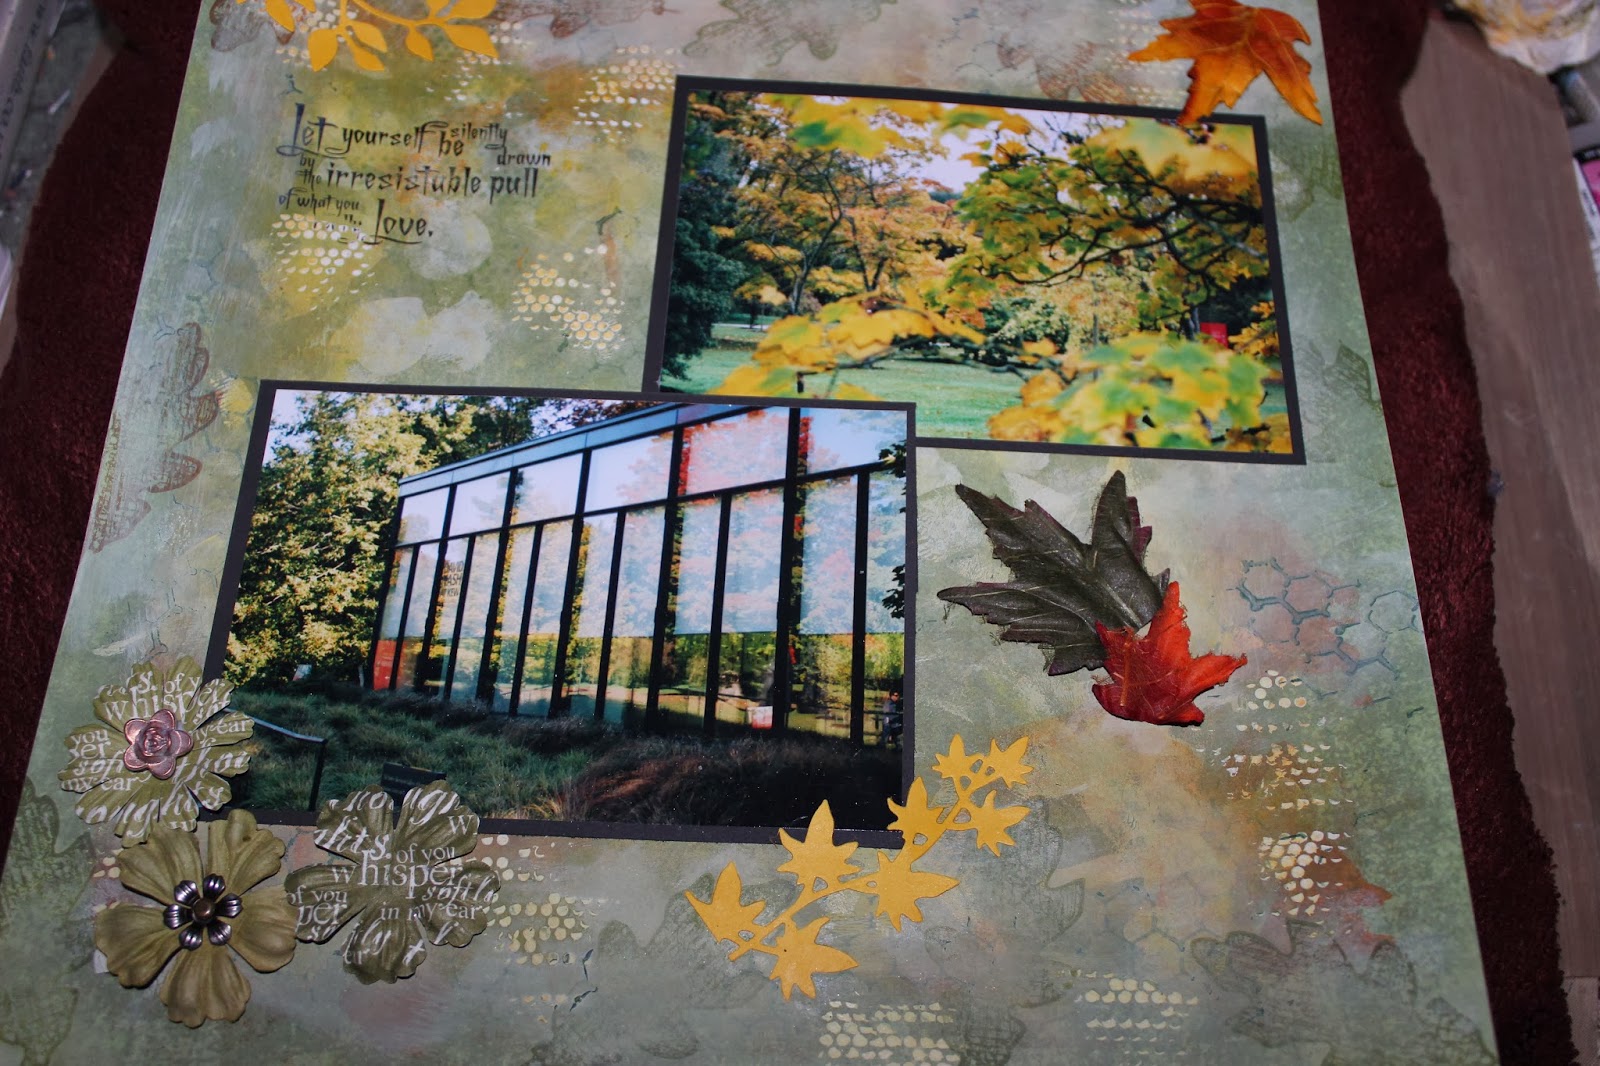
 then stencilled some grunge paste through the FAB bubbles stencil by Finnabair for Prima... loving it already!
 attempted some crackling round the bubbles... didn't crack particularly well (think the glaze was too thick)
 stamped some script over the crackle and round the sides (see later photo) then stencilled French Roast back through the stencilled bubbles (very tricky finding the right part of the stencil, having already cleaned the GP off!!
 time for embellies.... the leaf was cut by my friend Sam from the new Tim bigz die - it's an irredescent bronzey colour paper she used, just right...
the big flower is a Finnabair embellie, with a tad of Lake Wanaka brushed over and removed, and TG added, and the little one is a resin flower painted with Lake Wanaka and Space Cadet and TG'd

 added a stamped scroll and some dragonflies from my stash - painted them with Fresco but wiped most of it off, just left enough to give a key for the Ruby TG
Added some more little resin flowers in the left corner, also painted with Frescos and TG'd


This was a great, fun, project... I haven't decided what to do with  the inside of the box yet, so that may be for another day!

Entering the Paperartsy challenge here - check out some fab entries!

Wednesday 15 January 2014

TIO - DragonsDream - L and Script

Welcome to another challenge from the DragonsDream team - Sylvia's choice of letter and theme this fortnight - L and script.  Don't forget you have to make a tag, and use at least one real stamp.

This is mine - my L stands for Leaf.
I started by spray-mounting some dictionary paper to thin white card and sprayed it with various colours of Dylusions inks, then die cut some leaves from Tim's tattered leaves dies (the Bigz one and the movers and shapers smaller ones)


Before I die cut them, I also sprayed some black through the larger Dylusions alphabet stencil, and mopped up some excess ink on a tag. Obviously this has come out in reverse, because the tag was on top of the stencil, in the ink.  I then painted it with green Fresco paints - using Guacamole and Limelight.
 However, this didn't obliterate the heavy black spray enough, as I wanted to stamp on top, so I used some more Guacamole, watered down a little, to cover the tag.

I then stamped the script stamp from A Stamp In the Hand, in black archival ink.
 time for assembly!  I fiddled and faffed with some of the leaves till I was happy, then glued them using multi medium.


It needed more, so I took one of my Kaisercraft text stamps and stamped the sentiment on thicker white card, and used 3d foam pads to fix it to the tag. Added a sheer green ribbon.
close up - because I can - these pictures were taken with my new camera I treated myself to before Christmas... first time I've used it for things for the blog. I like the quality!

Hope you'll come and join in with us this fortnight, we'd love to see more of you taking part!