Sunday 29 March 2015

Paperartsy Challenge - Theme 6 - Grunge Paste

The new topic on Paperartsy, is Grunge Paste (or other texture pastes)  - love love love Grunge Paste! There have been some amazing projects so far, from Wanda Hentges's Garden Hanging, to  Lou Collins Wood Grain effect  and Liz Borer's Decorated Hand. 

I loved the wood grain effect, but had an idea to alter a little papier mache bird house - which doesn't have must room to give it the full treatment like Lou... However...


 I bought this little bird house (and 2 others) at the Port Sunlight show last October.. finally been able to use one!

No early stage photos, got a bit carried away... started by painting the whole thing with Snowflake, then started adding colours.. used Brown Shed (too red) Chutney (too dark) Haystack.. ok. Added some little leafy flowery stamps from the new ELB20 on the front,in Library Green archival and on some scraps of tissue for the sides
the little resin bird was painted with French Roast and then covered with Sapphire Treasure Gold and fixed to the perch with Heavy Structure Gel.
 added some dots of red for the flowers, using a Liquitex paint pen before adding the tissue to the side.
The roof was made by mixing GP with London Night Fresco and adding a reasonably thick layer to the roof of the bird house.
I think the roofer must be very inexperienced, because the roof spacing isn't very even (on the other side particularly!)  - used a coffee stirrer to draw the lines.
Once the paste was thoroughly dry (overnight) I added a thin slightly watered down layer of Dusty Teal to give it a bit of colour.

 the back was where I wanted to try the wood grain effect used so beautifully on the Paperartsy blog  - mixed the GP with Chocolate Pudding and slathered it on - I just drew lines down with the coffee stirrer again, and let dry. Added a thin wash of French Roast and sanded back lightly.
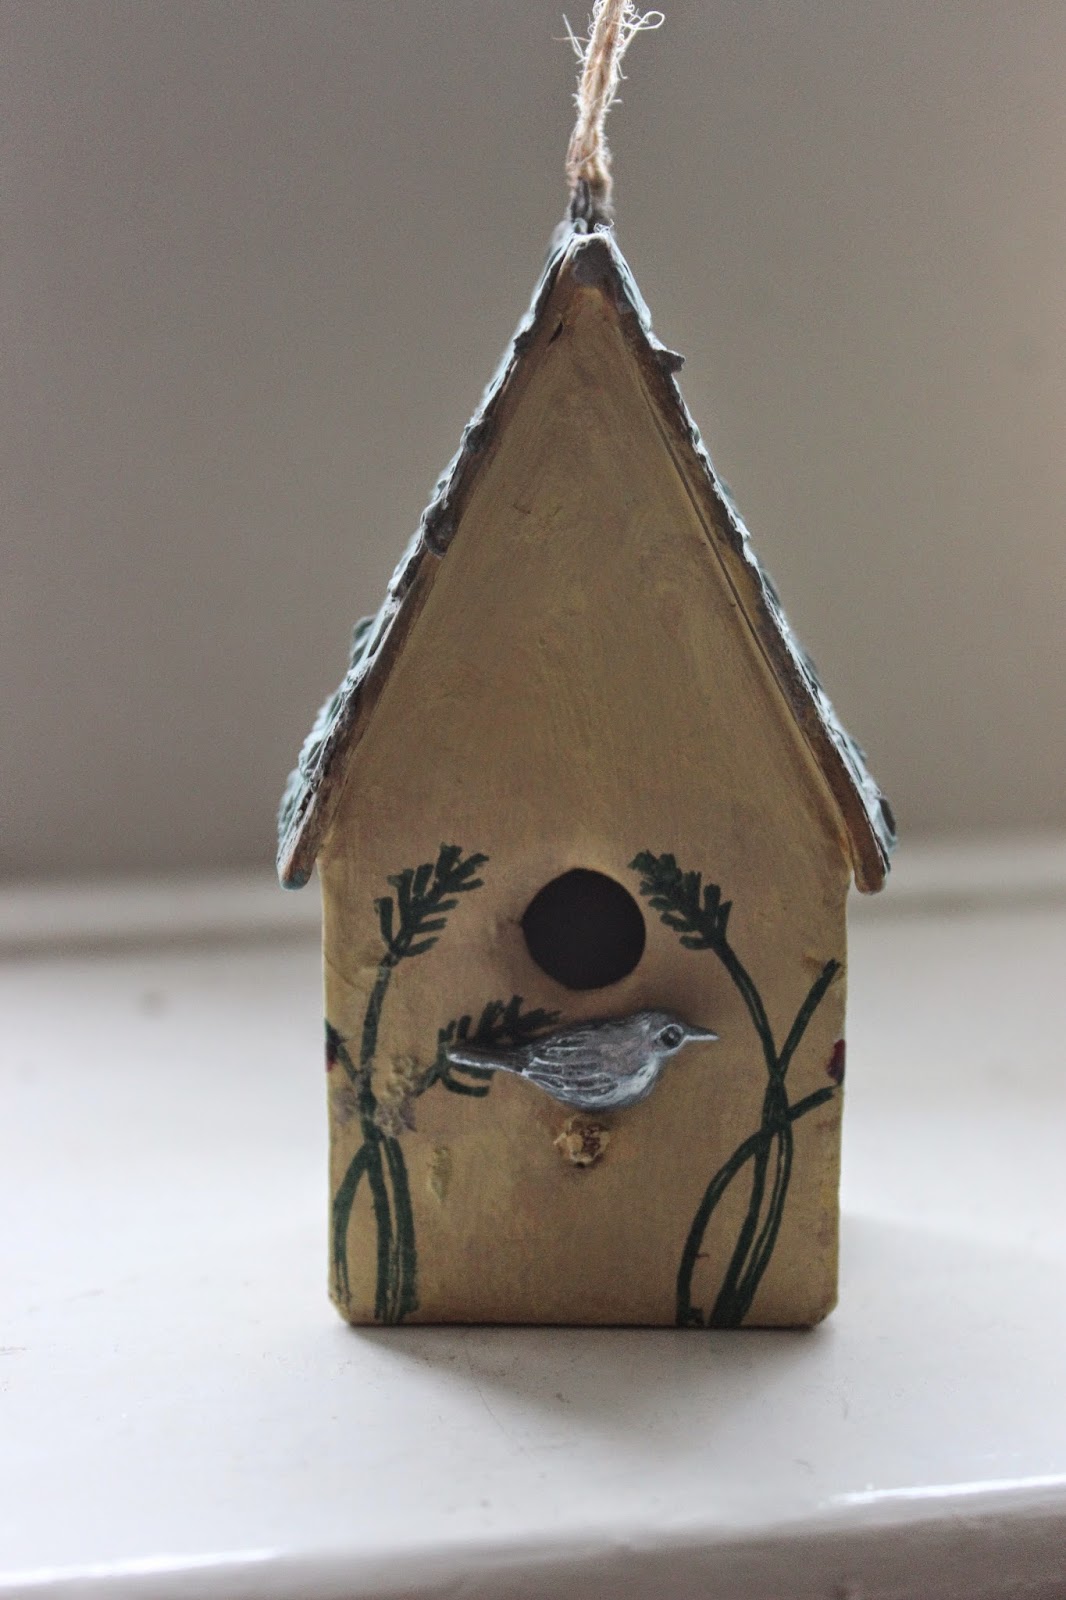

 I really had fun with this one (not so with the photographs, it's damp and dull this morning!!) and entering the Paperartsy challenge here 

Wednesday 25 March 2015

WOYWW 303

Here we go again.. Wednesday.. WOYWW day... and yes, I've been shopping... was getting withdrawal symptoms!  not just once.... or twice... but 3 times!

 this is the sum of the first two purchases... from a store that is closing down (thestampattic.co.uk if you want to grab some bargains) they arrived a couple of days apart, and in case you're wondering why I didn't just get it all at once, Wendy's adding things day by day to the sale...
 and these from Artist Trading Post arrived just in time for sharing, on Tuesday.


I realised though, as I was looking around the room,that when I got the two days buys back together for the top photo, I'd missed something out..  so this is day one on it's own, lol, (I couldn't be bothered to get everything out again to redo it) -  the fab wooden stamp is by Stampington and it's gorgeous, I've used it already.

So, no more excavating (again) owing to being sidetracked by goodies!  Have a cracking Wednesday, and I'll try to visit lots of you later... didn't do too well last week!

Sunday 22 March 2015

A trio of journal pages..

Been faffing again today for most of the day. some journal pages have come out of it but not without a fight, lol!
Let's start with the one that was a nightmare
 it started out ok... some swipes of leftover Fresco on a journal page (China) and some stencilling with the new JoFY stencil, in China and Blueberry.
still ok..

added some stamping... a new JoFY flower...
not good, even though I painted them (no photo of this stage, must have forgotten)
so painted over the page in Chalk Fresco.
It blanks out most of the stamping (good) and leaves some of the stencilling fairly visible (like that)...
 re-do the stencilling, just in Blueberry, repositioning the stencil to further hid the stamping underneath....

Not bad.. but what to go on top?  It's quite dominant, the Blueberry colour..
 added some different stamping, the circles are from the Sara Naumann stars set, the marks are made with the edge of one of those Catalyst things that come in different shapes... used Forget me Not archival and Blueberry paint respectively.

still a bit dominant, so added a wash of Chalk again, watered down so it only partly knocks it back...

Needs a final centrepiece...


so stamped one of the new Lynne Perrella images on smoothy and painted with translucent Frescos, China and Blueberry and a little zesty Zing.  A few final marks (another Sara stamp in black archival this time) before sticking the image to the page. Don't think it's wonky in real life!
page 2 - Be Happy - this in the A6 small journal.

the page had some texture paste stencilled on the left hand side already, added some more stencilling,  a Crafters Workshop stencil called Believe Script (think I'm going to like this one as much as the "art is" one then  painted over the left page in Oyster Blue,  then more stencilling from a new Crafters Workshop stencil in Blueberry. (Butterfly Collage)
 stamped the Stampington "elegant butterfly " stamp in Forget me Not on tissue, tore it and glued it to the centre.

Like this one...
and this one's ok too... Swipings of Blueberry, Glass Blue , China and Oyster Blue Frescos, keeping a light hand with the cut and dry foam (partly to spread the paint thinly and partly to keep the colours light)

Stamped the Indigoblu image on tissue in black archival, roughly tore it, painted on the reverse Snowflake behind the iris of the eye and then Glass Blue and a little Blueberry, to blend in with the colours on the page, glued the eye to the page.
Added some stamping in Cornflower archival, with the honeycomb from the Indigoblu borders set, and then 'keep taking chances' which is from Dina Wakley.

Thanks for looking

Friday 20 March 2015

Tag and ATC swap

I've recently joined in with another tag and atc swap and they are now on their way to their new homes.
Here's the ones I created - the theme was 'birds'

 tag one, Fresco background, the grasses stamped in the background are from Lost Coast Designs. the bird is from one of Lin's new sets for Paperartsy. the twigs for the nest were supplied by my other friend Lin, and which I've been hoarding!
 tag two, Stencil Girl stencil, and some shading with Fresco's, the bird is one of Dina Wakley's scribbly birds, with some hand-shading for the feathers.
 was quite pleased how the scribbly bird turned out.
 atc's .  crackle backgrounds.  I did write down what colours I used for this, but can't find where I put it...the one on the left is Antarctic on top...
Dina's scribbly bird on the left, and Harry (Lost Coast scruffy bird) on the right.
 Used Dusty Teal and Antarctic for the feathering...
Hope whichever of my swappees gets these, likes them!

Our next theme has been announced - watch this space!

Wednesday 18 March 2015

Dragons Dream - TIO - Toffee and Lace

Hello, and welcome for another fortnightly challenge from the Dragons-  this week the multi-talented Julie Ann would have us dreaming of toffee and lace.  

Fortunately there is a Fresco paint colour called Toffee, so I used that as my starting point.
Put a blog of paint on the tag (size 8) and brayered it out to mostly cover the tag, I left a few gaps for a bit of interest.
 I added some stencilling - one of the new Crafters Workshop stencils (this one is called butterfly collage, although I've not used the butterfly bits!)  I mixed some Prima light paste with a bit of the toffee paint, and stencilled the criss cross pattern down the right side of the tag.

It was a bit odd looking when it dried,so I partly sanded it back and added some of the same stencil with Nougat Fresco, both sides.
I edged the entire tag with a little Nougat on a piece of cut and dry foam.
Took me a while to figure out how to incorporate the lace, I tried all kinds of things, kept faffing, as you do.  In the end I settled for this, gluing it lightly in place, and took a silicone flower which I first painted with diluted Nougat, (to hide the pale pink) and coloured it with Renaissance Treasure Gold, and glued it to the lace into the hole in the tag.  It wouldn't stay in place, so added a brad
My centrepiece is a stamp by Dina Wakley, one of her new scribbled sillhouette ladies, stamped in black, on white Smoothy card from Paperartsy, and cut out.

The sentiment (also by Dina) went at the bottom, partly to give her something to ground her, so she wasn't hanging in mid air, and partly cos there was nowhere else left for it!! I edged the card with Toffee paint, and stapled it to the tag with Tim's tiny attacher.

Hope you'll come and see what the other Dragons have dreamt up this time - don't forget to join in, make a tag and use at least one real stamp.

WOYWW 302

Hi, deskers - I don't have much to show today, as I forgot to delve any further down the box that I started excavating last week.
We went for a quick drink after work on Tuesday to celebrate St Patrick's Day (love a pint of Guinness now and then!) so I was home later than normal.
So this is a speedy not quite desk share
My Fresco box got so full I had to buy a second one, but the stencils still live on top (for now) along with a load of new stamps I haven't got storage sorted for yet...
So I'll leave you to get on with the desks, link up is at Julia's as always...


Sunday 15 March 2015

Paperartsy Challenge - Deconstruct

Hi, the new theme at Paperartsy is "deconstruct" or re-purpose or upcycle...There have as always, been some fabulous projects shared, lots of rusting from Alison and Julie Ann, and a peeled paint journal from Pam.
I had occasion to make some birthday cards recently for a couple of lovely PaTwits, and had some of the tissue left over

 I had the two strips from the edges of a 12x12 sheet of decorated tissue, left and decided to use this in two ways.


I painted a journal page using a couple of the same shades of Fresco I'd used for the tissue, Plum and Chalk, with a little Banana, brayered to get a bit of a patchy finish.


I took part of one strip, and die cut some shapes...the new Tim Holtz Thinlets die, Mixed Media.
This proved somewhat tricky with the thin tissue.. however, eventually it worked. I glued it to the corners of the page as shown


then to use one of the larger pieces - I damped the tissue and tore the edges so it would fit down the middle, leaving the honeycomb die partly visible.

I painted the reverse of the tissue with Chalk, so that the stamped images on top would pop more from the front.
Glued this to the journal with Matt Glaze, and painted over the top with the glaze too.
 I wanted some more of the honeycomb die, but it had been so tricky to remove the centres from the honeycomb shapes, I used a piece of Smoothy card.. ran it back and forwards through the Big Shot twice, before removing it.  Still a bit of a faff, but eventually got the centres removed.  It was too stark to leave it white, so I grabbed some Plum Chalk and Banana paint and lightly dabbed it over with a brush, removing some of the paint with a babywipe to get a hint of the colour
For the words, I used the words on one of Jo's new stamp sets (JoFY33) stamped in black on Smoothy card, and cut into pieces,(deconstructed them!)  glued to the page with double sided tape and outlined with black portfoleo pastel, smudging with a damp brush


hopefully this is deconstructed enough, it was certainly fun playing with the leftover tissue again. Entering the Paperartsy challenge here 

Wednesday 11 March 2015

WOYWW 301

Hello, welcome back for another journey round the world, courtesy of Julia's Stamping-Ground 

I don't have anything new to share today, well I do sort of... First, it's time for the top layer of the box on the chair..
 I was asked to photograph it as I went down... all I've really moved the is pizza box that holds a couple of scrap layouts (the only 2 I've ever done) and some mdf letters I intend to alter eventually (ha ha)
There are a lot of bits of mdf of various kinds in this box (or at least on the top) -boxes, letters, chests,
and a fair few journals on the arm of the chair...


so I thought I'd line them up and see how many there are... I have a few completely untouched and a few on the go (start at the black A4 spiral bound one and work to the right, they all have pages done in them - that's 6, all different sizes.. and in fact I can see another one that's been started too, that is in the wrong place!)

So I hope you liked my line up today.. will see what I can dig down to next week!

Sunday 8 March 2015

Dragonflies and Crows

Discovered a page in my A6 journal which I've never shared - mainly because I have been undecided as to whether it's finished or not. But I was playing on another couple of pages today so decided to pop them all here for you.    
Can't remember which blues I used now, and the crows and arrows are Tim dies, with strips of tissue tape and a Tim stamp from one of his Classics plates.
 this page was leftover brushings from some of the new Frescos, although I can't remember which ones here either! the mauvey one is Lavender though...
 added some stencilled dragonflies (one of the new Crafters Workshop stencils I got the other day) in Blueberry, and doodled with a paintbrush round the edges in Glass Blue.

Given my colours I probably should have found a fish, as it has an underwater feel with the JoFY flowers from JoFY33. (painted with Glass Blue and China)
More blue leftover paint on this page, and the same dragonfly stencil, this is done in Blueberry, with Glass Blue again.

Stamped the dragonfly from JoFY13 and coloured it in with Glass Blue too, and some doodling with a sparkly gel pen.

Be Happy and the Perfectly Imperfect comes from JoFY34.


Paperartsy - Theme 4 - Miniature Art

The theme this last fortnight at Paperartsy, has been all things miniature... with some fabulously small works of art along the way.

I bet you'll be surprised by what I decided to do... given my love/hate relationship with the stuff - but yes, I decided to give shrink plastic another go!  I loved Julie Ann's miniature peg doll and then Emma made a gorgeous card with JoFY's new stamps...

I had an empty matchbox hanging around and decided to make a little flower garden...

 started with a layer of gesso, then Limelight.  Stamped the grasses from a JoFY set on tissue in Library Green archival, then glued them to the inside of the matchbox, taking the tissue up the sides of the box.
Painted over the whole inside again with Limelight.
 stamped the two sizes of flower from JoFY33 on shrink, (2 large and 3 of the smaller ones) and painted with Tangerine Twist and a little Bougainvillea. Let dry, then heated with the gun to let the magic happen... lots of cursing and thumping with a large acrylic block, and eventually got some shrunk flowers..
 arranged them in the matchbox, trimmed some of the stems so they'd fit, and then stamped the ladybird from the JoFY mini45 and painted it with Cherry Red and Blood Orange for a bit more depth of colour and shrunk that too.


Stuck two of the flowers onto the edge of the matchbox (which of course means I can't decorate and use the lid)
I may be changing my opinion of shrink .... these worked out ok!

Entering the Paperartsy challenge 4, here 


Wednesday 4 March 2015

Dragons Dream - TIO - White and a Number

Time for another Dragons Dream TIO challenge - this time, it's my lovely friend and very talented team-mate Gabrielle's choice - and she's picked White, and a number, for the theme.  Don't forget, you must use a tag, and at least one real stamp.  Have fun!

As you may have seen, I've been melting the plastic recently and splurging a bit on new crafty goodies.. and some of them make an appearance here.

 I started on a size 8 tag, and stencilled some numbers (Dylusions) using clear embossing ink, then embossed with white EP.  Painted the tag with Snowflake Fresco paint, and wiped off the paint over the stencilled numbers.
 some more numbers, used a Paperartsy Mini stamp, with some solid numbers, stamped randomly, right way up and sideways, without a block, and using Cracked Pistachio distress ink.  Dried it, but then wiped a little of it away with a not quite dry babywipe.

Took another number stencil (new, but not recently so, just never used) - by Stamps Away -  and Snowflake Fresco, then went over that with a white Sharpie marker and outlined with a fine artist pitt pen.
Took the diamond pattern from one of my new JoFY Paperartsy stamps and stamped it with Glass Blue Fresco,  which I also used to edge the tag.
 took one of the Silhouette Women from Dina Wakley, stamped in black on tissue paper, tore it out and glued to the tag, then took some watered down Beach Hut Fresco (it's already translucent, but wanted to make sure the 7 (my number) still peaked through her dress from the layer below.


Took the sentiment, from one of the new Prima stamps sets designed by Finnabair, and stamped on white scrap card.

Finished with some white fibres
Not particularly happy with this, but no time to make another tag, lol, as I was busy all weekend I had no time to play properly and am finishing this after work on Monday!

Do come see what the rest of the DT have done, and we'd love to see you join in!