Sunday 31 March 2013

Alpha Challenge - R

Happy Easter to you all.

I was a little late checking the new Craft Barn alpha/dictionary challenge today, what with the clocks going forward in the UK today, and losing an hour's sleep!! Summer Time - well, can we have some summer weather now please??? ! I woke to frost, although to be fair, the sun was shining too!

My perusal of my dictionary brought me to REFLECTION. I knew that I could go all deep and meaningful, but wasn't sure how to interpret that, so set about searching for my mirror image stamp and some reflected images.

The mirror image stamp is simply a block of solid rubber, that you stamp your image onto, before stamping it on your piece of art, thereby reversing the image.I have had it years, rarely used it and had to rummage hard to find it in amongst the drawers of stamps... So, here are some reflected mirror images - I chose stamps that work particularly well for this technique.

I decided to stamp the images on cardstock, and stick them into the dictionary, rather than stamping them straight on the page. I used a yacht (Stampscapes) an elephant (Tim Holtz) and the hand writing a letter (Wendy Vecchi) I used Paperartsy Fresco paint Tinned Peas to paint the background of the page, and some   watercolour pencils to colour the hand and the elephant, but distress ink to create the background for the yacht.  I used an alphabet set to spell out the chosen word to further highlight my choice.


Saturday 30 March 2013

Mixed media canvas - Anna Style!!

I have long admired the style of Finnabair - Anna Dabrowska and had my work situation been a bit more settled, I would have applied to attend the classes she is teaching at Snazzy's in Swindon later this year, but right now can't afford to (maybe next time!!)  It's the spraying with black that gets me...

Anyhow, this afternoon I decided to have a crack at a small version on canvas....

I needed to find a small photo - preferably black and white - to use... obviously I don't have any of me - but I did find some that I took on a visit to Kew Gardens - I used to love black and white photography, but haven't done any for ages now... But I'm waffling. I found a suitable picture that I could crop without losing the focal part of the picture.

 For once I planned out the look of my piece, before starting to glue stuff down.  My first step was to ink some bubbles through a stencil with iced spruce distress ink. Permanent ink would have been better, of course, given that you spray over the top later... derrrr. told you it was my first go!
You are meant to keep the spray off the photo, but....

Anyhow I used some glimmer mists (a gold, a silver and key lime pie) I chose some green Prima flowers. to tie in with the natural theme, some leftover sparkly mesh and a couple of flourishes which I 'painted' black with archival ink and then added some Treasure Gold (white fire) and a couple of metal flowers.
Used some buttons and black dew drops for some of the flower centres.

When you've finished placing everything on (though I did add the black drops last of all) you give it a squirt with black - this is sooo scary, and my black (Black Marble Dylusion) did end up a bit heavy handed in places.
It would have been better on a larger canvas, but I wasn't sure how it would turn out for my first go, but I do like the look and will definitely have another go!


Thursday 28 March 2013

Off the Wall

Evening!! A late one from me, have been falling asleep on the sofa on and off all evening...

I had some free time today, and played with a tag (as you do!) and the fab fab fab Grunge Paste from those clever Paperartsy people...

 Painted the tag with London Bus Fresco paint and applied the grunge paste through the brick wall stencil (crafters workshop)
Further grunged up the edges of the tag with walnut stain distress ink, and stamped the vine from Wendy Vecchi over the tag. Think it may have shown up more in archival rather than distress ink. (but I don't have green archival.... it's on the list for Ally Pally!)

Stamped Wendy's running man (I always think he's running for a bus) on kraft card and cut out, glued to tag.

The sentiment is also one of Wendy's, stamped on the same kraft card, and cut up and stuck on, then I scribbled round the edges with a black gelly pen.
Also "finished" (I think!) the time tag that was on my WOYWW desk yesterday. Used the leftover die cut weathered clock (left from the Suzz shaving foam card the other day) and one of Tim's stamps.  The "time" is part of a stamp from one of Paperartsy's Clocks series.

Wednesday 27 March 2013

Dragons Dream- Tag It On #138

Welcome back for another dream with the Dragons Dream team. This fortnight, the fabulous Sue challenges us with a recipe of Blue, the Sea and Stencil(s)

I decided to use my Stampscapes 'the great wave' stamp which judging by the look of it has maybe been inked once since I bought it - many many years ago!

 I started with the stamp, in black archival on the tag and sprayed London Blue Dylusions ink at the top, and took a paint brush to spread it over the whole tag. I added some of the White Linen to reduce the vibrancy of the colour a bit, and tough it doesn't show particularly well, it kind of looks where it's dried, like sea spray flying from the crest of the wave...

I then took a white pen and highlighted the waves, before adding white puff paint (Crafty Notions) and heating it.

The stencil I used is Dylusions diamond border as it has a wavy border, so tied in with the sea theme, (loosely!) and inked Chipped Sapphire distress through it.

I don't have a surfer stamp (I think Stampscapes do do one though) but inked one of the two figures from another Stampscapes image and stamped him on the top of the wave.

The sentiment is one of Wendy Vecchi's.
Finally some blue ribbons and some little shells (I had these in a vase that originally contained an airplant that my late parents gave me some years ago but which I managed to kill off - I suddenly realised they were shells, not little stones and bingo!! they are now in my stash boxes!


I was originally quite stuck with this recipe, but am quite pleased with how it turned out.
Do come over to the Dragons Dream blog to check out the other tags from my team-mates and please have a go.  You need to use a tag, and at least one real stamp, and follow the recipe. It's that simple!

(edit:  there has been a bit of a technical hitch with the TIO post. it will be there as soon as we can!!)

WOYWW 199?

Crikey, nearly WOYWW anniversary time, better get making some ATC's... Don't know what WOYWW is? All the low-down is found here  and so is the link up to share YOUR desk.

Not a lot on my "desk" today - a part-done tag, not quite sure where to go with it now...

I took this one from the sofa... new Art Journalling mag on the floor... tag on the craft sheet... pots and pots - or lots of pots you could say - of pens and implements and coffee stirrers - behind them out of which the "reserved for" sign is still hanging, is my scraps box - once more it's overflowing, oh dear.... not much came of that resolution to only keep scraps of a size I could use..ha ha!!

The basket sits on top of one of those cardboard storage boxes which holds stamps (yes more, don't think I've ever shone you inside that one!) The basket holds all sorts of trinkets and bits and bobs - gems, frames, fancy buttons (too nice to use!)

So. hope you've had a good rummage, make sure you leave the place tidy when you go, please - cos it's always so neat here (chokes with laughter)..... I'll catch as many of you as I can, as always! Now, off you go, don't be late, Julia's waiting for you...see you soon.

Monday 25 March 2013

Suzz week - Shaving foam

It's the turn of Suzz again at Paperartsy  and today she has been playing with shaving foam.  Check the link for Suzz's fab card - ideal for a man, normally so hard to design for!!

Now, many years ago I had a go with this technique but it had been relegated to the back of my mind; luckily I still had the can of foam.... !!! (good job I don't turn things out, eh?!)

Anyhow, this is my effort.  I don't have the car stamp that Suzz used, but I do have this London Bus (HP1208) never used before! I die cut the weathered clock in kraft paper and added some walnut stain distress ink too, before adding it to the card.  I didn't have a black card blank to mount it on, so just distressed the edges of my background as Suzz did, and layered it onto a white card. I was feeling a bit stingy with my idea-ology bits and pieces, so left that step out.

 I got in a bit of a mess on the mat, (should have used a tin lid or something.... but the mat got a spray clean after, so it's not all bad!!
these are the backgrounds I made - the earlier ones before the colours blend too much are better, but I'm sure I can use them for something!

I had forgotten what messy fun this technique is, but next time, as Leandra told me on Twitter, I won't use so much foam.... ok, Leandra, you were right!!

Sunday 24 March 2013

Playing with Grunge Paste

My blog/twitter buddy Sam recently asked me if I'd played any more with the new Paperartsy Grunge Paste.  Today I had a chance to do just that.

I had a page in my Moleskin journal on which I'd painted off some 'spare' Eggplant fresco paint.  I took my Grunge Paste and using a palette knife, stirred it to loosen it, you get icing-type drippability and I duly dripped and draped the paste randomly over the page.

I added some fresco paint in Claret and a smidge of Beach Hut, partly over the grunge paste.. and added a bit of Snowflake white with some cut and dry foam.


Decided this didn't allow the texture of the grunge paste to show enough, so I added some more...

I wanted some stamping on the page too, so used the music score from the Eclectica set by Sara Naumann (ESN07)


This was really just an experiment with the paste, so it's not in my view a "proper" journal page, but I quite like it!!


But I wanted to do something else with the Grunge Paste too.  As you may have seen last time when I used it, you can colour the paste with the Fresco paints.  Here, I took a Maya Road scalloped frame, and mixed on the craft mat, some London Bus Fresco paint, with the grunge paste... I dolloped the resulting pink mixture over the frame, trying to clean the edges to allow the scallops to show (I can't ice cakes neatly either!!!) and then patted the palette knife into the paste to get some texture in the paste.
I went for the smaller tulip  stamp by Lin Brown  (ELB03) and the stalk, stamping it so the stem lines up under the tulip head...


For the tag, I used Fresco paint in Stone (this is a fabulous background colour, I love it!!) and dry brushed Hyde Park randomly (sparingly) over the top.


Saturday 23 March 2013

Another Portfolio pastel page

I had such fun the other day with the oil pastels on my journal, that I decided to have another go - this time I used the bold hand-carved images designed by Lin Brown for the Paperartsy Eclectica series. I just knew they'd look great with the white doodling...

I forgot to take any pictures during the process, but it's the same as before, blocking the colour on and then blending them all in, I used slightly darker colours this time.  I love this page and am really happy with how it came out.  I did have some trouble with the photo, as it's been snowing on and off today and has got quite dark... but this one without flash, came out ok.

Wednesday 20 March 2013

Portfoleo brights - journal page

Yesterday's treat from Linda for the Paperartsy challenge, was a journal page using Portfoleo Pastels- bright bright bright!  I didn't have a chance to tackle this challenge until this evening - but here is my offering!
 
ok, so you start by adding colour to the page - in hindsight I think I could have gone more blocky ...


Blended and black scribble added, random stencilling.
Forgot to take a picture after the main image was stamped, before I started scribbling in white pen... and could have been a bit more careful where I stamped the image, to avoid the scribble through the face!  However, this was quite fun, next time I will just go with the flow rather than try and think it through so much! I kept stopping and starting and checking back to Linda's original (which is gorgeous!!)  thanks, Linda for another inspiring piece.

WOYWW 198

Happy Wednesday desk sharing to you all!  Head to Julia's gaff at the Stamping-Ground for the low-down and link up...

The news this week is that I do have a desk.... however before you all fall off your perches, it's not a craft desk- apart from the sloping front, it is much to beautiful! - I will still be crafting on the floor - but a much loved desk that belonged to my Dad and that I always always said I wanted after he'd died.... finally, now it is here, at home with me - some of you know that my brother and I are in the process of clearing/decorating with a view to sell or rent out, my late parents' house and last weekend, we brought it home to Sutton. Here it is, in my bedroom.. reminding me of Dad, every time I see it!
it's made from mahogany and is very heavy! inside are loads of little compartments for ink and pens and stuff.
there are doors at either side with more trays for stuff!  so far it's still empty!  Getting it into and out of my brother's car and up the stairs to my first floor maisonette was interesting, to say the least!
Isn't it gorgeous!


I've had lots of happy mail since we last met - I was lucky enough to win one of Neil's new stamps in his recent giveaway - how cool is this!


Then there was a Tando prize from the recent Craft Stamper magazine's blog hop that I won. (my choice of goodies)


and finally a large pile of unexpected stash enclosed with a few sheets of cardstock from my blog & twitter friend Sam who'd just been the the UK skiing and sent me some extras - naughty girl! but how lovely is this lot! Chip pieces, foam pads (I was running out too!) and lots of little packets of embellishments of all sorts. Soooo kind, Sam!!


So, that's me this week - what do you have on your desk?  I'll be round to check up on you...


Tuesday 19 March 2013

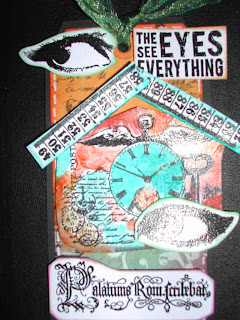
Linda's back - Eyes tag

The oh so talented Linda Cain is back wowing us at Paperartsy and yesterday she created an amazing tag, mixing Fresco paints and distress inks - crafty heaven!

I didn't have the same house/shrine stamp Linda used so had to adapt - here is my version!  I followed the method that Linda used so won't repeat all the instructions here - check the Paperartsy blog for Linda's step by step...

 here are my pieces waiting assembly.  All stamps are by Paperartsy, from all sorts of plates!!
I broke open a new black archival ink pad today, as I wasn't getting much luck with my embossing - wow, what a difference - my old one must be soooo dry!! (Must get a re-inker at Ally Pally next month!!)

It's nearly time for Linda's second project of the week - I can't wait!!

Monday 18 March 2013

Leaves are Green - or are they?

There is an ATC swap currently in progress on the Yahoo Group Everything Wendy Vecchi based on the current challenge - leaves, and green (as it's supposedly Spring, and was St Patrick's Day yesterday.)

I decided to both join in the challenge and the ATC swap.  I don't make many ATC's (as will become apparent when you see mine!!)  You can do 3 the same or 3 different.

I painted 3 ATC's with Hyde Park Paperartsy Fresco paint, and a little Limelight over the top to lighten them a bit, as one or two of them were a bit dark.  I rolled the leaf stamp from It's Face Art in black archival  on the top and bottom of each ATC, and edged the leaf in white pen (Posca).


Die cut the leaves (Tim's movers and shapers) from book pages and sprayed them with Dylusions sprays in green, orange and white linen.  The text is also Wendy's from Funky Flower Art and is stamped onto some scrap card sprayed with Dylusions green sprays (all of them!)  I used the spotty border stamp (Seriously Art) in coffee archival, rolling it for random stamping, on the background of the ATC

Used 3d foam pads to raise the text from the ATC.

The challenge is open till 26th March and the ATC swaps need to be with Lori (in the US) or Gabrielle in the UK by 15th April, so you have plenty of time to join the group and join in. Wendy is even donating a randomly awarded prize.

Crafty Boots DT - Challenge

Welcome back to another challenge for Crafty Boots.  This week Kerry has chosen the theme 'flowers' to remember Rhianna Lily's birthday which would be this week.  Sending you much love, Kerry.

I used Paperartsy Fresco paints on my tag (there's a surprise!) and Jo Firth-Young's stamps for Paperartsy.

 my starting point was a tag that I had used to mop up various colours of Fresco paint by swiping the tag through the paint on my craft mat and wiping off the paintbrush... a right mess you would think!

 knocked back the paint with watered down snowcap white to make it less opaque but leave some of the background showing through.
Then stamped various of the Jo Firth-Young stamps in black archival, before painting them.
close up - stamped the words amongst the stalks.
Used a white pen to scribble over the zigzags on the leaves and stalks

Sunday 17 March 2013

Craft Barn - Alpha Challenge - P

The latest fortnightly alpha challenge for the Craft Barn is "P". I was flicking through my dictionary and keeping in mind what stamps I have to go with the words as I read them - my eye alighted on "pear"

I am partial to a nice pear, one of my favourite fruits (raw, not so fond of tinned pears) - but they do tend to be one of those fruits that are rock hard and unripe one day and have turned to over-ripe mush the next.... however I have a few stamps from A Stamp in the Hand along the subject so I was set...


I started by painting the page round the definition with Snowcap white Fresco paint and stamped the Pears - Words stamp in the top corner. However there wasn't enough paint on the page, and the dictionary words came through, so I painted over it with another layer of Snowcap, then added a light coat of Guacamole over the whole page, and some more Snowcap on top to lighten the green.

It was time for stamping proper now! I changed the placing of the words, going for the bottom right page  and down the left hand edge of the first page (this bit was always my plan!) in black archival ink.  The pears - I have a large and small version of the single pear, and the 3 pears together are on one stamp - I used a mixture of Distress inks, blending them on the stamp - Mowed Lawn (kept this mainly for the leaves) Crushed Olive and Rusty Hinge.

I was going to write words on the page, that describe pears, but cut them from the rest of the dictionary and fixed them with a Pritt glue stick.


Sorry about the photos -  it is really dull and I am having problem getting close ups without using the camera's flash!

Thursday 14 March 2013

PA Grunge Paste play

The fab people at Paperartsy have brought out some Grunge Paste and I had to have some... I've been wanting to get hold of some texture paste for stencilling for ages.  This can do so much more but I haven't had much time to try yet!  So I took one of the door hanging pieces (also by Paperartsy) and the leafy vine stencil.

 I left the hanging plain before applying the paste through the stencil.


You can also mix the paste with paint (this is Tinned Peas) which is what I did here at the top of the hanging.  I just put a little amount of paint on my craft mat and a little more of the GP and mixed the two with the palette knife I then applied it through the stencil with.

Then I decided to paint over the whole thing anyway, but it's nice to know how easy it is to do...!!


I used Vanilla, Tinned Peas, and Hyde Park, a little Beach Hut
knocking back with paper towel and baby wipe to mix and remove .. and adding more paint
i added some Zesty Zing too, round the leaves, again knocking it back to leave just a hint of yellow.
 I also used some Beach Hut round the edges and just a little French Roast to give the edges a bit of an aged shabby look, wiping most of it off.
Finally I added some Treasure Gold with my finger to the leaves
(this is White Fire) and along the groove at the edge.  It was getting a bit dark by this time, just got there without having to use flash!


Wednesday 13 March 2013

WOYWW 197 - 13th March

Hi, everyone, welcome back for another Wednesday snoop-fest. Head girl Julia has the info here  It was lovely to see so many of you last week, thanks for stopping by.

This week sees my desk  floor  (on a Tuesday evening, but don't tell!) in mid-challenge for the Tim Holtz tattered floral challenge (there by the magic of blog scheduling, is the finished article in the previous post!) -there would have been new stash but Mr Postie didn't deliver today!!


This shows how I got the depth my floral centrepiece! (and all the mess behind it!)


Some of you know that I am shortly to be made redundant and that there have been several months of worry at the company money-wise - but I am delighted to report that I finally received all the missed pay I was due, on Monday of this week. PHEW what a relief! I can eat again...lol!


Don't forget to share your desk or crafty spaces at Julia's - I'll be coming to see you soon!

Tuesday 12 March 2013

Tim's Tattered Floral Challenge

At the beginning of March, Tim announced a challenge to use his gorgeous tattered floral die and create something - anything - to be in with a chance of winning $100 worth of Tim goodies. Well, it would be rude not to enter, right?! I love the tattered floral die.... so, at last I had a chance to have a play. (You have until March 22nd to enter) Thanks, Tim!

 This is the finished tag.... but I started with the centrepiece.
Cut the tattered florals twice using sticky back canvas (Claudine Hellmuth) which I then stamped the butterfly text background from Tim's  Papillon set (I used royal purple versafine)

I painted the petals with Paperartsy Fresco paint in Eggplant, watered down and blotting the canvas to lighten the colour so the text showed through.  Did the same for the big die, using Limelight Fresco paint so they appear as leaves.

Stuck the green leaves to a die cut in chipboard I found in my stash (handy, not having used it before!)  The second (not shown in this pic) I used Toad Hall so it was darker, and would show up between these leaves. (see first picture) having stamped it with the criss cross background from Tim's Mixed Media set (stamped in pine tree green archival)

For the tag, I used the background stamp again, with the purple versafine pad, having painted the tag with watered down Eggplant again. Rolled the stamp randomly, some of them sideways for variation.
To fix the flower, I wanted some depth between the petals and leaves. I found a bottle cap lying around and using glossy accents, pressed the petals into it, bending them down a little round the cap.  Glued the cap to the green layer.

Die cut some tattered leaves (the smaller movers and shapers  rather than the bigz die) and stamped the background as before, and painted them in limelight. The teeny tiny petal is fixed to the edge of the tag so nothing was left over!

The middle of the flower is a purpley glass bead from my stash - I bought a pack of these years (literally!) ago, and have never used one of them! It fitted perfectly. It was meant to be, obviously!

Finished with some purpley ribbons.

I really had fun with this, am now off to link it up.
Good luck if you have a go too.