Once again, we find ourselves at Wednesday. Julia is gathering the troops as ever at The Stamping Ground
We are approaching the 9th anniversary and our annual ATC swap, not that I've done anything about that yet! Perhaps I'll get time at the weekend, the weather is forecast damp so I'll probably be at home.
Anyway, desk time...
I was watching You Tube on Saturday morning in bed before I went to Kew Gardens (amazing photos here if you're interested!)
and saw some gorgeous stencils which then fell into my shopping basket (along with some Dina Wakley collage tissue sheets that I've had my eye on for a while)
They arrived in time to star on this week's desk, how kind was that!
this week's theme for the Facebook France Papillon challenge is "friends" and I am workingat this at present.
base layer was paint brayered on a sheet of 12x12 tissue and glued to the journal and trimmed. I used about 6 or 7 different colours, blues and greens and some yellow.
the hearts are all stamps - the little white ones in paint, are France's own design, and the others are Dina Wakley and I used archival ink in Cobalt and Thistle (love that colour!)
We've had some amazing sunsets the last few nights (well not tonight - writing this Tuesday - it's been dull and grey and turning a bit drizzly) this was from a few nights ago.
Looking forward to seeing what you've all been up to this week - Happy WOYWW !
The increasingly inky and painty ramblings of a stampaholic, whilst kneeling on the floor. Yes, my knees do protest!
Showing posts with label FB challenge. Show all posts
Wednesday, 25 April 2018
Friday, 9 March 2018
France Papillon FB challenge - week 10 - Broken
Although I've still been playing along with France's FB challenge, I haven't got round to blogging one of my spreads for a while.
next I added some stamping - a stamp from a new set for Paperartsy by Emma Godfrey, inspired by her love of Portugal.
It's a kind of crazy paving effect and I stamped it without an acrylic block (broken stamping!)
I added some hearts and coloured them red.
My main focal point was a stencilled heart - I took a piece of Tim Holtz tissue wrap and a Stencil Girl heart stencil, and Deco Art crackle paste.
As the paste dried overnight, it caused the tissue to crinkle and the paste cracked - never mind crackle!
I tore the heart in two - do you see where I'm going- broken hearted!
as I tore the tissue, little bits of crackle fell off, and I decided to stick them in the middle of the page
I stamped a border at the top of the page and the word broken on a piece of card (Tim Holtz foam alphabet stamps), and stuck as shown
close up of the cracked crackle paste
However, this week, the theme was Broken; with no other prompts or hints... to be interpreted anyway we fancied.
Just because it was new, I started with painting the page in Fresco paint shade Sargasso.
I didn't take any step by step photos of each day's layer on my camera, so we'll go straight to the finished page:
and then I'll talk you through what I did.
Day 2, layer 2 was the brick wall - using fibre paste (mine is by Golden) - used bits of the stencil so the wall looks broken...
It's a kind of crazy paving effect and I stamped it without an acrylic block (broken stamping!)
I added some hearts and coloured them red.
My main focal point was a stencilled heart - I took a piece of Tim Holtz tissue wrap and a Stencil Girl heart stencil, and Deco Art crackle paste.
As the paste dried overnight, it caused the tissue to crinkle and the paste cracked - never mind crackle!
I tore the heart in two - do you see where I'm going- broken hearted!
as I tore the tissue, little bits of crackle fell off, and I decided to stick them in the middle of the page
I stamped a border at the top of the page and the word broken on a piece of card (Tim Holtz foam alphabet stamps), and stuck as shown
close up of the cracked crackle paste
I've had to seal it with clear gesso as the pieces were still falling off and I realised I wouldn't be able to close my book (heaven knows what will happen when I do something on the next page!)
however, I really like this page and am very happy how it came out - especially as after layer 2 I had no idea what was happening next!
Wednesday, 7 March 2018
WOYWW 457 - upcycling
Time for another WOYWW - luckily we are rid of the snow and freezing cold we had last week - the UK - especially where I am "down south" gets it so rarely (thank goodness) - but as you may have seen on Facebook or in my post on my photos blog (here if you're interested) - I fulfilled an ambition to enjoy Kew in the snow on Saturday.
Glad it's gone now though!
So, upcycling... one of the advisers at work (I work for a firm of mortgage advisers) had a "thank you" gift sent from a client after he moved into his new home... and they didn't even have to ask me...
the stack of boxes (had been filled with chocolates and other edible goodies) - came straight my way as they emptied!
I was more interested in the boxes, honest (but did help out eating the contents!) and I finally got my hands on the last one today, hence them making an appearance here
I love how they stack, Russian doll-like, inside one another before I "do something" with them... which takes up lots less space round here! No idea at all yet what I will do with them, but that isn't the point, is it?!!
at the weekend I finished a journal page I'd started just for fun, a while ago - background was some stamps from a new set by Tracy Scott for Paperartsy.
I turned it into a piece for the prompts challenge I'm doing with my friends, the butterflies are cut out from the Tim Holtz tissue paper and coloured with Fresco paints in some of the new greens and blues.
the green page on my workspace next to the boxes, is the latest spread for the France Papillon FB challenge. To answer someone's question from last week, about how I know when a page is finished... well for this challenge, after a week, as it is a layer a day challenge, over a week. so 6 (or 7) layers. If I'm doing a page just for me - well, when it feels finished!!
Have a good week, and happy desking!
I'll leave you with a peek at snowy Kew!
"my" fountain!
Glad it's gone now though!
So, upcycling... one of the advisers at work (I work for a firm of mortgage advisers) had a "thank you" gift sent from a client after he moved into his new home... and they didn't even have to ask me...
the stack of boxes (had been filled with chocolates and other edible goodies) - came straight my way as they emptied!
I was more interested in the boxes, honest (but did help out eating the contents!) and I finally got my hands on the last one today, hence them making an appearance here
I love how they stack, Russian doll-like, inside one another before I "do something" with them... which takes up lots less space round here! No idea at all yet what I will do with them, but that isn't the point, is it?!!
at the weekend I finished a journal page I'd started just for fun, a while ago - background was some stamps from a new set by Tracy Scott for Paperartsy.
I turned it into a piece for the prompts challenge I'm doing with my friends, the butterflies are cut out from the Tim Holtz tissue paper and coloured with Fresco paints in some of the new greens and blues.
the green page on my workspace next to the boxes, is the latest spread for the France Papillon FB challenge. To answer someone's question from last week, about how I know when a page is finished... well for this challenge, after a week, as it is a layer a day challenge, over a week. so 6 (or 7) layers. If I'm doing a page just for me - well, when it feels finished!!
Have a good week, and happy desking!
I'll leave you with a peek at snowy Kew!
"my" fountain!
Sunday, 25 February 2018
"Stencils" for a prompt
the latest prompt for my little group was stencils... so I have "one or two" ...... I decided to use several, some old loved ones, and a new one.
I started with a page in my square journal which I love but which is so hard to photograph (I'll have to crop more!)
I had already wiped the leftover paint (butter, from one of Seth's new Paperartsy sets) on the background then stencilled (new, Sara Naumnann's stencil) with Venice Blue, and in some of the gaps Glacier Ice
Added some Donna Downey stencils - alphabet in Butter and Glacier Ice, some small dots in Butter and then the big circles - first gesso'd, then added Blue Lagoon and some more small dots
I drew round the big circles in pencil through the stencil and added some stamping - a Kaisercraft italic script; in watering can archival and two JoFy Mini (firework?) stamps in cobalt and French ultramarine archival inks and used a pen to fill in the centres of the bigger fireworks
I re-outlined the circles in a blue micron pen
and erased the pencil lines
I had a ball with this page and could have gone on for ages!
I started with a page in my square journal which I love but which is so hard to photograph (I'll have to crop more!)
I had already wiped the leftover paint (butter, from one of Seth's new Paperartsy sets) on the background then stencilled (new, Sara Naumnann's stencil) with Venice Blue, and in some of the gaps Glacier Ice
Added some Donna Downey stencils - alphabet in Butter and Glacier Ice, some small dots in Butter and then the big circles - first gesso'd, then added Blue Lagoon and some more small dots
I drew round the big circles in pencil through the stencil and added some stamping - a Kaisercraft italic script; in watering can archival and two JoFy Mini (firework?) stamps in cobalt and French ultramarine archival inks and used a pen to fill in the centres of the bigger fireworks
I re-outlined the circles in a blue micron pen
and erased the pencil lines
I had a ball with this page and could have gone on for ages!
Friday, 26 January 2018
France Papillon - ALAD/ASAW - week 4, Emotions in Shapes
Facebook group challenge - France Papillon and Creative Butterflies group - ALAD/ASAW (a layer a day/a spread a week) -Emotions in Shapes...
Found this a hard prompt to get started with.. but everyone loves circles so I used circles again..
Took lots of daily pictures of each stage, but all by artificial light or flash, so bear with me!
my page was pre-gesso'd, and I added distress oxides in Fossilized Amber, Twisted Citron and Salty Ocean... the Fossilized Amber didn't show up as much as I wanted, so added some Wild Honey over the top. smooshed and blended them with water a bit...
When it was dry, I carefully (with a silicone brush) added clear gesso to seal it. That is the extra texture you can see in the colours)
Day 2, the first circles - a fantastic stencil by Stencil Girl (well part of a stencil (I wish they'd put the names on the packets, I don't know what this is called) anyway, I used Deco Art crackle paste and let it do it's thing
(another never used before stencil!)
GORGEOUS crackles!
Day 3 was more stamping - using the same colour distress oxides and a Dina Wakley stamp (I love this stamp)
if you click on the picture you will see some of the Honey/Citron stamping
Day 4 was some doodling - I could see faces in the crackle shapes so I decided to emphasise them (especially the one top left)
Day 5, more circles, another stencil. This is a That's Crafty Dinky stencil. First, I used Paperartsy Fresco paint in Bora Bora ( a gorgeous blue/green) and when that dried, "bumped" the stencil - moved it just a fraction off centre to the original position and stencilled Snowflake Fresco.
you get a great shadow.
it's ages since I used this technique
Day 6, more stamping, a Paperartsy JoFY Mini stamp - little circles and a criss-cross hatch design that mimics the shapes in the crackle and the other circles.
Doodled over them with a couple of Stabilo felt pens

close up of the doodles
Final layer - day 7, today
I had to decide on a title, and I needed words on my page..
Much searching of stamps in my (large) collection... until I used one that was staring me in the face from a Dina Wakley set.
Art Is Life,
Stop Thinking, Just Create.
Edged the page in Black Soot distress oxide
Looking forward to the next prompt tomorrow..
Found this a hard prompt to get started with.. but everyone loves circles so I used circles again..
Took lots of daily pictures of each stage, but all by artificial light or flash, so bear with me!
my page was pre-gesso'd, and I added distress oxides in Fossilized Amber, Twisted Citron and Salty Ocean... the Fossilized Amber didn't show up as much as I wanted, so added some Wild Honey over the top. smooshed and blended them with water a bit...
When it was dry, I carefully (with a silicone brush) added clear gesso to seal it. That is the extra texture you can see in the colours)
Day 2, the first circles - a fantastic stencil by Stencil Girl (well part of a stencil (I wish they'd put the names on the packets, I don't know what this is called) anyway, I used Deco Art crackle paste and let it do it's thing
(another never used before stencil!)
Day 3 was more stamping - using the same colour distress oxides and a Dina Wakley stamp (I love this stamp)
if you click on the picture you will see some of the Honey/Citron stamping
Day 4 was some doodling - I could see faces in the crackle shapes so I decided to emphasise them (especially the one top left)
you get a great shadow.
it's ages since I used this technique
Day 6, more stamping, a Paperartsy JoFY Mini stamp - little circles and a criss-cross hatch design that mimics the shapes in the crackle and the other circles.
Doodled over them with a couple of Stabilo felt pens
close up of the doodles
Final layer - day 7, today
I had to decide on a title, and I needed words on my page..
Much searching of stamps in my (large) collection... until I used one that was staring me in the face from a Dina Wakley set.
Art Is Life,
Stop Thinking, Just Create.
Edged the page in Black Soot distress oxide
Looking forward to the next prompt tomorrow..
Saturday, 20 January 2018
France Papillon's FB ALAD/ASAW - week 3 "say yes to everything"
Hi, again.
I have another spread for you in my journal I am dedicating to the a layer a day/a spread a week Facebook group challenge - say yes to everything - you can see the details about the challenge here
Whilst saying yes to absolutely everything could get one or two people into serious trouble, in a journal it is no problem!
Here is my finished page, before I give you some step by steps - the joy of doing just one layer a day (it is still SO hard to stop!) does mean at least there should be no problem with forgetting to photograph a layer!
I started with a layer of Paperartsy Fresco chalk acrylic (still my favourite go to paint for journalling - so pleased to see some new colours being launched at Creativation at the USA trade show this week)
Lake Wanaka, a gorgeous blue - spread with an old credit card
Day 2, I tore some old book pages (a Russian book text that was gifted me by my friend Chris)
which I stuck and sealed with matte medium
Day 3 I added another, lighter, brayering of paint (Antarctic, a really pale blue) to tone it down.
Day 4, I stamped a variety of circles.. who doesn't love circles?!
stamps by Paperartsy the blue inked ones) and a bottle cap dipped in white paint
Day 5 I stencilled Coarse Texture paste through a Paperartsy stencil (you can possibly tell I was too impatient to link today's later to the FB group album to wait for it to fully dry...)
I used a paste by Reeves which I've had ages... using up stuff still, you see!
Day 6, I added a row of skulls - stamp by Carabelle Studio - love these skulls... this is the first time I've used them - I did stamp them out when I first got them but haven't actually used them on a project before...
the row of skulls is about 12 inches, and I had to snip it in the middle to allow the page to close still
final day, layer 7 - edged the journal with Cornflower Blue archival ink, and added the Dina Wakley stamped sentiment, stamped on a piece of the original Paperartsy Crinkly tissue, (hoarding it) which I tore and glued with matte medium to the page..
was pleased how well the torn edges blend into the page so you can see them
you ca see the texture paste well in this one, and get a good idea of how coarse it is.
Say yes to everything - yes to using up stuff, yes to using new stuff,
Really enjoyed this week's page coming together, but must now go and see if the next prompt is ready, to start all over again!
Thanks for looking.
I have another spread for you in my journal I am dedicating to the a layer a day/a spread a week Facebook group challenge - say yes to everything - you can see the details about the challenge here
Whilst saying yes to absolutely everything could get one or two people into serious trouble, in a journal it is no problem!
Here is my finished page, before I give you some step by steps - the joy of doing just one layer a day (it is still SO hard to stop!) does mean at least there should be no problem with forgetting to photograph a layer!
I started with a layer of Paperartsy Fresco chalk acrylic (still my favourite go to paint for journalling - so pleased to see some new colours being launched at Creativation at the USA trade show this week)
Lake Wanaka, a gorgeous blue - spread with an old credit card
Day 2, I tore some old book pages (a Russian book text that was gifted me by my friend Chris)
which I stuck and sealed with matte medium
Day 3 I added another, lighter, brayering of paint (Antarctic, a really pale blue) to tone it down.
stamps by Paperartsy the blue inked ones) and a bottle cap dipped in white paint
Day 5 I stencilled Coarse Texture paste through a Paperartsy stencil (you can possibly tell I was too impatient to link today's later to the FB group album to wait for it to fully dry...)
I used a paste by Reeves which I've had ages... using up stuff still, you see!
Day 6, I added a row of skulls - stamp by Carabelle Studio - love these skulls... this is the first time I've used them - I did stamp them out when I first got them but haven't actually used them on a project before...
the row of skulls is about 12 inches, and I had to snip it in the middle to allow the page to close still
final day, layer 7 - edged the journal with Cornflower Blue archival ink, and added the Dina Wakley stamped sentiment, stamped on a piece of the original Paperartsy Crinkly tissue, (hoarding it) which I tore and glued with matte medium to the page..
was pleased how well the torn edges blend into the page so you can see them
you ca see the texture paste well in this one, and get a good idea of how coarse it is.
Say yes to everything - yes to using up stuff, yes to using new stuff,
Really enjoyed this week's page coming together, but must now go and see if the next prompt is ready, to start all over again!
Labels:
ALAD/ASAW,
FB challenge,
France Papillon,
journals,
paperartsy
Saturday, 13 January 2018
Week 2 of ALAD/ASAW
So, France Papillon's A Layer a Day/a Spread a Week. week 2, prompt was Visualise...my biggest dream for 2018.
Well I didn't do too much dreaming but I did visualise the spread at the outset of the week and only deviated a little bit from my plan!
Here are some step by step photos of the way it panned out..
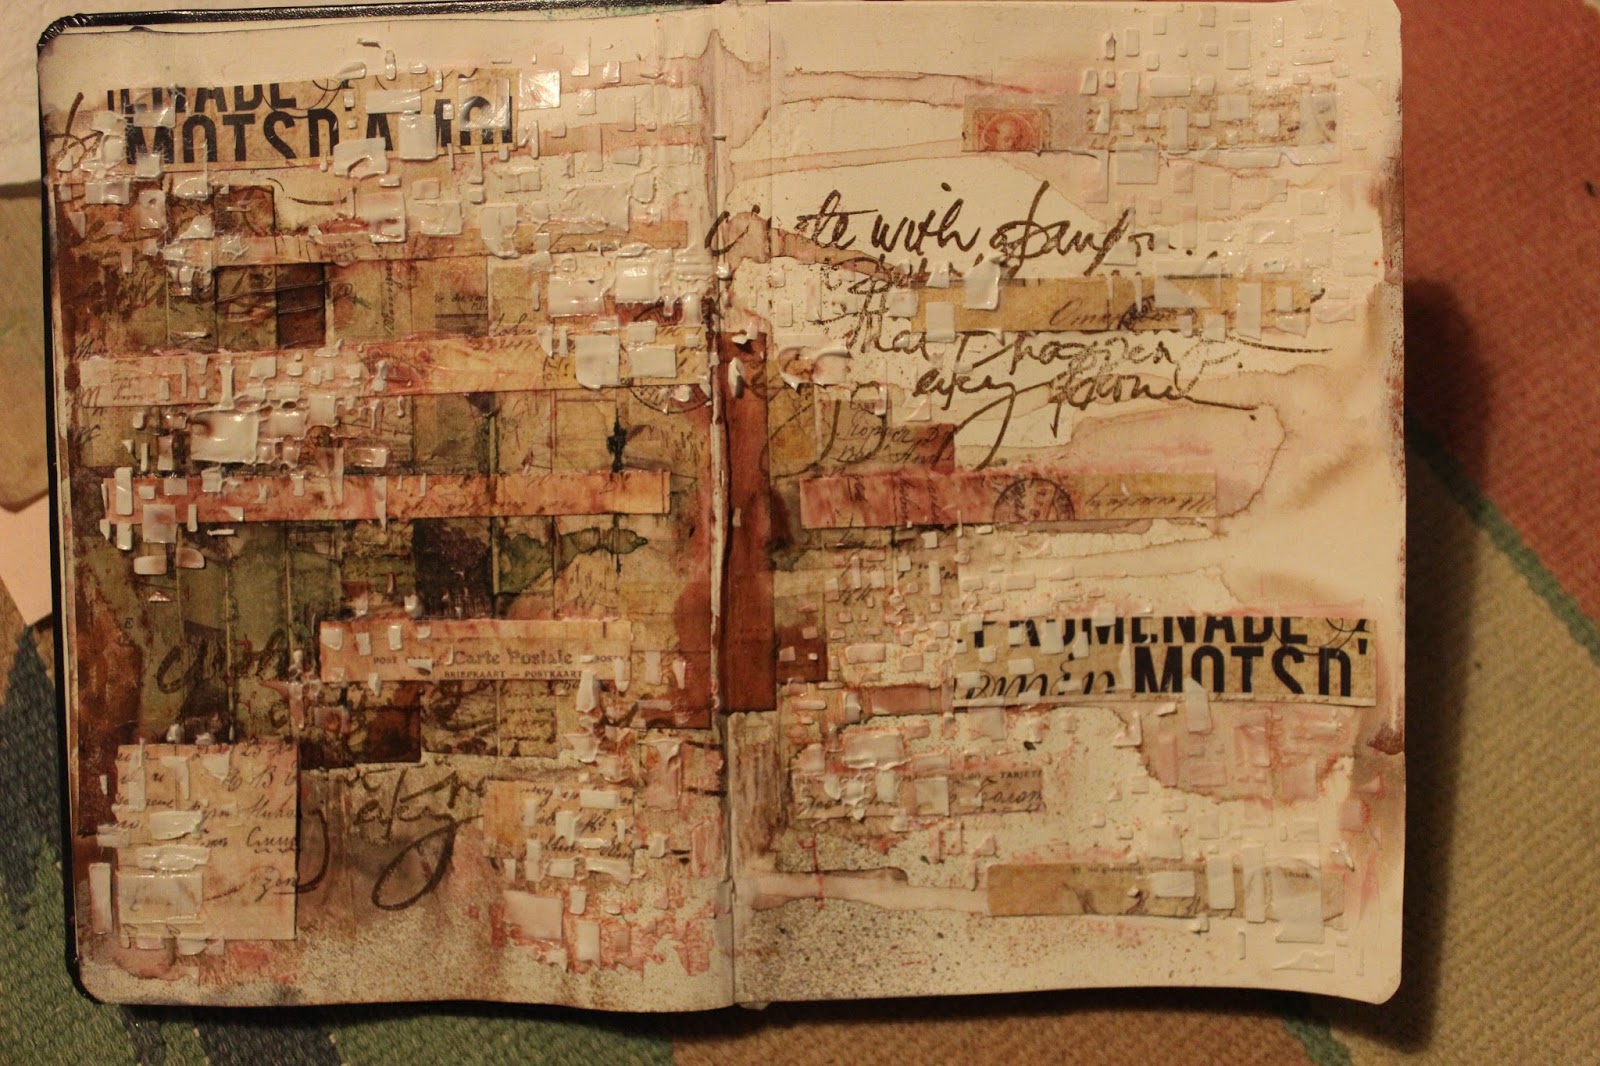
day one, cut some patterned paper into strips... (a Prima pad from my stash... 2018 is the year of use it up!)
in hindsight (that valuable crafting tool) I would have varied the height more...
my initial inspiration was from the memory of one of France's Journal on Monday videos from I don't know when!
day two, stamped a Dina Wakley script in Potting Soil archival ink..
Day 3 where I thought it was going wrong... used the Melted Chocolate Dylusion spray, spritzing and dripping from the end of the tube... went a bit pinky as it dried...
did not like it much at this stage (but France did... )
anyway, onwards to day 4, layer 4...
Day 4, (which had been going to be day 3)
applied more strips of the same paper horizontally...
and this is what it looks like with the flash!
day 5.... stencilling. started out so well..
used an opaque white modelling paste (Finnabair's for Prima) was still nice and white whilst it was wet...
but of course what I hoped wouldn't, did happen - the paste in drying picked up the colour from the drippage/sprays underneath. and became pink....
but it's ok, there are no errors only lessons for the future...
and it seemed quite popular on the Facebook group...
look how pink it looks!
Day 6, apply a focal image... two, actually.
Tim Holtz paper dolls (2018 is the year of use it up... have had these months and months and these are the first ones I've used from the packet0
I sat the man on one of the horizontal paper strips to ground him, and the girls stood on the edge of the page...
day 7, final layer... splatters.
I was always going to add splatters.
after my issue with the paste on day 5 I was wary... but have splattered black and white acrylic paint ... it's still wet so we'll see what happens.. (it seems to be going a bit pink...)
and edged the pages in Black Soot Distress Oxide.
Week 3 commences today... we'll see what happens next!
Well I didn't do too much dreaming but I did visualise the spread at the outset of the week and only deviated a little bit from my plan!
Here are some step by step photos of the way it panned out..
day one, cut some patterned paper into strips... (a Prima pad from my stash... 2018 is the year of use it up!)
in hindsight (that valuable crafting tool) I would have varied the height more...
my initial inspiration was from the memory of one of France's Journal on Monday videos from I don't know when!
day two, stamped a Dina Wakley script in Potting Soil archival ink..
Day 3 where I thought it was going wrong... used the Melted Chocolate Dylusion spray, spritzing and dripping from the end of the tube... went a bit pinky as it dried...
did not like it much at this stage (but France did... )
anyway, onwards to day 4, layer 4...
Day 4, (which had been going to be day 3)
applied more strips of the same paper horizontally...
and this is what it looks like with the flash!
day 5.... stencilling. started out so well..
used an opaque white modelling paste (Finnabair's for Prima) was still nice and white whilst it was wet...
but of course what I hoped wouldn't, did happen - the paste in drying picked up the colour from the drippage/sprays underneath. and became pink....
but it's ok, there are no errors only lessons for the future...
and it seemed quite popular on the Facebook group...
look how pink it looks!
Day 6, apply a focal image... two, actually.
Tim Holtz paper dolls (2018 is the year of use it up... have had these months and months and these are the first ones I've used from the packet0
I sat the man on one of the horizontal paper strips to ground him, and the girls stood on the edge of the page...
day 7, final layer... splatters.
I was always going to add splatters.
after my issue with the paste on day 5 I was wary... but have splattered black and white acrylic paint ... it's still wet so we'll see what happens.. (it seems to be going a bit pink...)
and edged the pages in Black Soot Distress Oxide.
Week 3 commences today... we'll see what happens next!
Subscribe to:
Posts (Atom)