Quite a milestone in the life of What's on Your Workdesk? Wednesday... week 400... that's a lot of desks!So, Julia, much loved Head Desker - we salute and thank you for having the patience to keep going this long! We have made lifelong friends because of you, given and received support in good times and bad, and - just possibly - enabled one or two deskers to buy more stuff!! (I hold my hands up!)
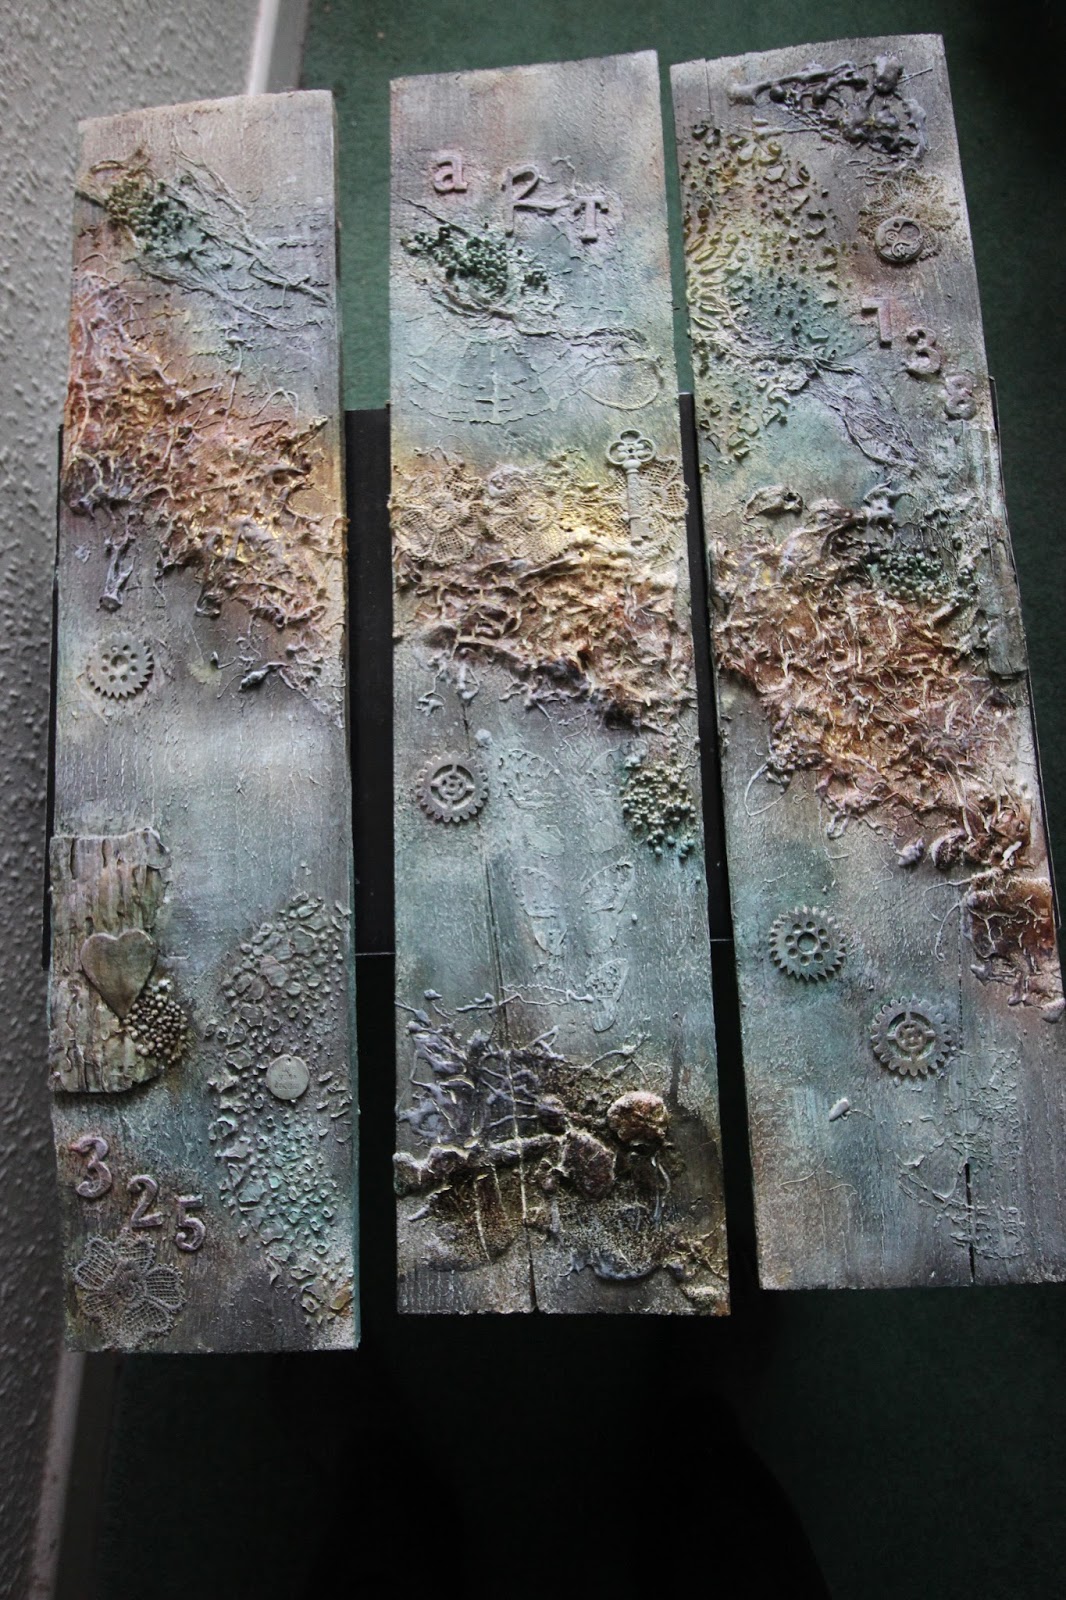
I had a fantastic time at the Powertex workshop last weekend (full report and LOTS of pictures in this post here ) these are the pieces laid out drying on Sunday after I added some "finishing" touches (there may be more of those to come yet!)
This (Tuesday) evening I have been making a birthday card for a friend which needs to get in the post to arrive for the weekend...
my journal underneath has some stencil work (texture paste) over a Bistre background (I used some to add some colour to the edges of the plaques from the workshop)
(Bistres are like brushos or infusions)
In case you don't have time to read the whole post on the workshop, this is the finished project (unless I add more colour, there is some debate as to whether I added too much white paint dry brushing and it needs to be darker and more grungy!)
So, happy 400th WOYWW and have fun desk hopping again today!
The increasingly inky and painty ramblings of a stampaholic, whilst kneeling on the floor. Yes, my knees do protest!
Wednesday, 1 February 2017
Sunday, 29 January 2017
Powertex Workshop with Allison Turner and the Girls!
Yesterday was my long awaited (really long awaited, we booked it months ago!) Day Workshop with Allison Turner in Long Eaton, Nottingham. We were doing a Powertex Tryptych on fence panels.
A very early start (after a traumatic Friday night but never mind that!) saw me leaving for the train to London St Pancras at 6.30 to meet Lin.
Luckily the trains ran on time and Chris met us at the station to take us to Allison's studio. Sadly Emma and Lin R were unable to make this one - we missed you both - but Sam, Lin, Chris Lesley and I had a good old natter..
So, Powertex and fence posts... This is the kind of Powertex project I have been wanting to do ever since we first saw it at the Glasgow SECC the other year... The Angel (here) was amazing... but this... oh boy.
first step (after tea and coffee!) was to paint the fence panels with gesso
they're about 2 foot long to get an idea..
Sam struggling with the concept of pink gloves... think she abandoned them early on...
I persevered with mine only because I didn't think I'd get my hands clean before the train home!
Chris struggling with the coarse texture of the fence panels, really wanted to sand it smooth...
Once the gesso was dryish, came some stencilling with structure paste - we used the Powertex one, but any firm modelling paste would do..
hard to see the white on white, but it's there.

once the stencilled paste was dry, came some more texture, (3d flexx mixed powertex liquid) , the drippier the better.. but you mix it to the consistency you want. Not too wet or it will fall back in on itself (think very heavy pancake batter)
as you can hopefully see, were working across all 3 at once, for the flow.
Then we add colour (Bister spray)
Chris's looked amazing already - she got some superb stringy drips with hers
my spraying leaves a lot to be desired! I have a love/hate with spray bottles (just ask my rug!)
Just before lunch, we added some more texture, from a large choice (Allison supplied chipboard ones, we took a variety of different embellieshments, Lesley had some Grungeboard numbers and letters... and stuck them on to dry
Lunch time was birthday present opening time, both Lin and Chris had birthdays this week (and Emma on Monday coming)
so there were cards and gifts and of course, cake!
more texture added, with some of our own and Allison's embellishments, torn cardboard...
those of you who've worked with Powertex know how messy it is, so to keep taking a glove off and trying to get it back on again for lots of step by step pictures was tricky!
but I do, just for you... and my record of course!
Lesley (sitting) Sam and Lin, hard at work..
I clambered over some chairs behind Lesley to get a different angle on the day! Sam's boards looking fab.
Emma wanted in progress pics, so we sent her one of Sam taking a WIP of her own boards..
and that seems to be where the photos from the actual workshop end...
we added Bister sprays and lots of other colour sprays too, there is a good squirt of Sunshine Yellow (perfect pearls)
blame the spray colours and the trying to get it dry enough (the thick areas of the 3d Flexx mix take a while to dry, even with a heat gun) for there being no more....
back at home however, I unpacked the boards which had survived the journey (apart from some balls!) and it dried more fully overnight
Time for some finishing touches this morning
Dry brushing... Had my Ivory Powertex bottle been opened since I bought it, I could have used that, instead I used firstly gesso, then White Snowflake Fresco as the gesso wasn't pronounced enough..
anyhow, several layers of dry brushing over the raised areas and the texture on the wood grain...
then to add a bit more colour..
which doesn't quite show up..
I used Treasure Gold, in ruby, emerald and white fire... you can't really buff it though over the coarse texture so you'll have to take my word for it, that it is there
out into the hall to get some photos of them all side by side..
and some close ups
the flower in the corner is from a piece of lace flower trim I got super cheap in The Works...
three together squished into the paste mix under the key...
loving the clumps of stone art balls in the drips too... these balls kept falling off and I lost some more on the way home, but not too many.
the dry brushing has brought out the stencilling (here on the butterflies)
What a great workshop - lovely to see Sam, Lin, Lesley and Chris again, Allison we thank you once again for your tutorship and your time. Emma and Lin R, hope you can make the next one!
Now to find somewhere to hang them (and somehow to hang them...!)
A very early start (after a traumatic Friday night but never mind that!) saw me leaving for the train to London St Pancras at 6.30 to meet Lin.
Luckily the trains ran on time and Chris met us at the station to take us to Allison's studio. Sadly Emma and Lin R were unable to make this one - we missed you both - but Sam, Lin, Chris Lesley and I had a good old natter..
So, Powertex and fence posts... This is the kind of Powertex project I have been wanting to do ever since we first saw it at the Glasgow SECC the other year... The Angel (here) was amazing... but this... oh boy.
first step (after tea and coffee!) was to paint the fence panels with gesso
they're about 2 foot long to get an idea..
Sam struggling with the concept of pink gloves... think she abandoned them early on...
I persevered with mine only because I didn't think I'd get my hands clean before the train home!
Chris struggling with the coarse texture of the fence panels, really wanted to sand it smooth...
Once the gesso was dryish, came some stencilling with structure paste - we used the Powertex one, but any firm modelling paste would do..
hard to see the white on white, but it's there.
once the stencilled paste was dry, came some more texture, (3d flexx mixed powertex liquid) , the drippier the better.. but you mix it to the consistency you want. Not too wet or it will fall back in on itself (think very heavy pancake batter)
as you can hopefully see, were working across all 3 at once, for the flow.
Then we add colour (Bister spray)
Chris's looked amazing already - she got some superb stringy drips with hers
my spraying leaves a lot to be desired! I have a love/hate with spray bottles (just ask my rug!)
Just before lunch, we added some more texture, from a large choice (Allison supplied chipboard ones, we took a variety of different embellieshments, Lesley had some Grungeboard numbers and letters... and stuck them on to dry
Lunch time was birthday present opening time, both Lin and Chris had birthdays this week (and Emma on Monday coming)
so there were cards and gifts and of course, cake!
more texture added, with some of our own and Allison's embellishments, torn cardboard...
those of you who've worked with Powertex know how messy it is, so to keep taking a glove off and trying to get it back on again for lots of step by step pictures was tricky!
but I do, just for you... and my record of course!
I clambered over some chairs behind Lesley to get a different angle on the day! Sam's boards looking fab.
Emma wanted in progress pics, so we sent her one of Sam taking a WIP of her own boards..
and that seems to be where the photos from the actual workshop end...
we added Bister sprays and lots of other colour sprays too, there is a good squirt of Sunshine Yellow (perfect pearls)
blame the spray colours and the trying to get it dry enough (the thick areas of the 3d Flexx mix take a while to dry, even with a heat gun) for there being no more....
back at home however, I unpacked the boards which had survived the journey (apart from some balls!) and it dried more fully overnight
Time for some finishing touches this morning
Dry brushing... Had my Ivory Powertex bottle been opened since I bought it, I could have used that, instead I used firstly gesso, then White Snowflake Fresco as the gesso wasn't pronounced enough..
anyhow, several layers of dry brushing over the raised areas and the texture on the wood grain...
then to add a bit more colour..
which doesn't quite show up..
I used Treasure Gold, in ruby, emerald and white fire... you can't really buff it though over the coarse texture so you'll have to take my word for it, that it is there
out into the hall to get some photos of them all side by side..
and some close ups
the flower in the corner is from a piece of lace flower trim I got super cheap in The Works...
three together squished into the paste mix under the key...
loving the clumps of stone art balls in the drips too... these balls kept falling off and I lost some more on the way home, but not too many.
the dry brushing has brought out the stencilling (here on the butterflies)
What a great workshop - lovely to see Sam, Lin, Lesley and Chris again, Allison we thank you once again for your tutorship and your time. Emma and Lin R, hope you can make the next one!
Now to find somewhere to hang them (and somehow to hang them...!)
Wednesday, 25 January 2017
WOYWW 399 ... more new stuff!
Hi and welcome, it's Wednesday again, time for Julia to muster the troops at the Stamping Ground for WOYWW
I think I managed to visit everybody last week apart from the Google + sites that won't let me comment (I just looked!) which is the first for a long time.
So, my desk.. (oh, for a proper desk!)
I'm going up to Long Eaton in Nottingham on Saturday for a Powertex workshop and am amassing things I need to take - apron, train tickets are the most important... but also some birthday presents as two of the girls have birthdays this week...
the lacy trims and bits are to take in case they can be incorporated into the project.
the bright green notebook (and another blue one underneath) were donated from a lad at work - just ordinary thin paper lined notebooks.. Did I want them... of course I did...
Love it when everybody saves stuff for me!!
but, new stuff, the title promised. I didn't mean the notebooks..
Paperartsy have launched a huge new release of products, you may have seen ... I "may" have ordered....
5 sets of stamps (oops) and 4 stencils...
whilst I was ordering the stencils, I checked out the modelling paste that I had had in my "basket" for a week or so...
You may notice that two of the stencils have been used...
Yes, this is a "staged" shot... I tried to rotate the original photo but messed something up and couldn't, so I had to get the stuff out again and re-do the photo....
I have used some of the stamps too, but for now they are still living in their packets (that won't be for long)
I haven't got any further with the Finn style canvas from last week, haven't decided how many gazillion flowers to put on it! (did laugh at Julia's comment!) and it will probably be after the weekend now.
I'll show you what we did at the workshop, after Saturday - it will probably get a post of it's own. Watch this space. Till then, happy WOYWW
I think I managed to visit everybody last week apart from the Google + sites that won't let me comment (I just looked!) which is the first for a long time.
So, my desk.. (oh, for a proper desk!)
I'm going up to Long Eaton in Nottingham on Saturday for a Powertex workshop and am amassing things I need to take - apron, train tickets are the most important... but also some birthday presents as two of the girls have birthdays this week...
the lacy trims and bits are to take in case they can be incorporated into the project.
the bright green notebook (and another blue one underneath) were donated from a lad at work - just ordinary thin paper lined notebooks.. Did I want them... of course I did...
Love it when everybody saves stuff for me!!
but, new stuff, the title promised. I didn't mean the notebooks..
Paperartsy have launched a huge new release of products, you may have seen ... I "may" have ordered....
5 sets of stamps (oops) and 4 stencils...
whilst I was ordering the stencils, I checked out the modelling paste that I had had in my "basket" for a week or so...
You may notice that two of the stencils have been used...
Yes, this is a "staged" shot... I tried to rotate the original photo but messed something up and couldn't, so I had to get the stuff out again and re-do the photo....
I have used some of the stamps too, but for now they are still living in their packets (that won't be for long)
I haven't got any further with the Finn style canvas from last week, haven't decided how many gazillion flowers to put on it! (did laugh at Julia's comment!) and it will probably be after the weekend now.
I'll show you what we did at the workshop, after Saturday - it will probably get a post of it's own. Watch this space. Till then, happy WOYWW
Wednesday, 18 January 2017
WOYWW 398
Hello and welcome back to another Wednesday.. Julia is hosting WOYWW again and I see when I popped over to check the week number, that she's updated her blog - looking good, Missus!
Anyhow, mydesk floor awaits your inspection.
3rd desk of the year, and new stuff!!
I was killing time before my haircut on Saturday and found myself in Rymans stationers.. dangerous... very dangerous.
not 1 not 2 but 3 new journals.. although one to be fair is just a thin sketchbook (I liked the weight of the paper, will probably use it for the pages)
and some stamps. a new Paperartsy set for the new year of Wanderlust classes.. had to be done!
Incidentally, Paperartsy have released a whole HEAP of new stamps/stencils/infusions and re-issued some discontinued paints... I am broke already - hopefully by next week's instalment there will be loads to show you!! (one order on the way, another one being processed....and I am sitting on my hands to stop myself putting in another one tonight!)
this is the final WIP from last week (the other two are finished and full details available here - in the post below this one)
This is the one that was going to be a Finnabair inspired canvas. got a bit out of hand with the colour (prima colourbloom spray mostly) over what was there already. so now I am not sure...
I had got as far as picking out some metal embellies to use on it.. but have put them away for now.
I may as you see, just go flowery instead, I have about a gazillion paper flowers I could use!
(and if I use up a load, I can buy more, right?!) the pack to the left of the canvas that is reflecting the light so badly so you can't really see it, is a pack of feathers. just the right colour for what I was thinking.. so they may feature, too.
That's it for me today, will catch you all soon.. failed to get round the list last week what with one thing and another!
Anyhow, my
3rd desk of the year, and new stuff!!
I was killing time before my haircut on Saturday and found myself in Rymans stationers.. dangerous... very dangerous.
not 1 not 2 but 3 new journals.. although one to be fair is just a thin sketchbook (I liked the weight of the paper, will probably use it for the pages)
and some stamps. a new Paperartsy set for the new year of Wanderlust classes.. had to be done!
Incidentally, Paperartsy have released a whole HEAP of new stamps/stencils/infusions and re-issued some discontinued paints... I am broke already - hopefully by next week's instalment there will be loads to show you!! (one order on the way, another one being processed....and I am sitting on my hands to stop myself putting in another one tonight!)
this is the final WIP from last week (the other two are finished and full details available here - in the post below this one)
This is the one that was going to be a Finnabair inspired canvas. got a bit out of hand with the colour (prima colourbloom spray mostly) over what was there already. so now I am not sure...
I had got as far as picking out some metal embellies to use on it.. but have put them away for now.
I may as you see, just go flowery instead, I have about a gazillion paper flowers I could use!
(and if I use up a load, I can buy more, right?!) the pack to the left of the canvas that is reflecting the light so badly so you can't really see it, is a pack of feathers. just the right colour for what I was thinking.. so they may feature, too.
That's it for me today, will catch you all soon.. failed to get round the list last week what with one thing and another!
Sunday, 15 January 2017
Some Finished WIPS...
so, following on from my WOYWW post, a couple of the pieces are now finished. (well the arch canvas was finished already but I am sharing some details of how it was done)
Sadly I only took one photo of the beginning stages , and had already added the black modelling paste through the stencil by then.
the canvas is about 9 1/2 by 11/12 inches and is one of those flat canvas boards (from The Works)
I had added various brown Fresco chalk paints - all kinds of colours, to get some shading I can't remember what colours though now...
once the stencilled windows were in place and thoroughly dry, I added some die-cut bats on black card
I took a Paperartsy stencil for some grassy effects at the bottom. I wanted more texture, so mixed a couple of green Frescos (Wintergreen and something else!) with some matt 3d gel
I used a heavy gel glue to fix the bats and left the wings of the larger ones proud of the canvas for more dimension - though you can't really tell from the angle of the photos, sorry!
closer look at the greenery
at the top, I mixed some art stones into some 3d gel coloured with French Roast fresco paint
Now need to find something to fix it to hang up somewhere...
the other project I finished, is the big A4 journal page.
I don't have any pictures (other than the one I shared on Wednesday) of the starting point of this page...
Lots of blue Frescos, stamps (Seth Apter circle-y ones) texture stencilling (originally with heavy gesso, top right, middle left and bottom right) under the Frescos In some of the stencilled circles I have stamped some Prima circle-y stamps and some more stencilled dots
I stamped the Prima girl on some tissue paper and coloured her from behind with Frescos and some butterflies, (also Prima) on white card stock and fussy cut them and painted them
added some splatters in black and white
the sentiments are from Prima too.
I used slightly brighter, translucent shades for the butterflies (Southern Skies and Glass Blue)
I also added some more stencilled circles in a couple of places, using Finnabair's Light Paste, which picks up the colours underneath so it blends in again.
Hope you like these, I had lots of fun with both of these projects.
Edit. as prompted by Alison, I am sharing with A Vintage Journey "going round in circles"
Sadly I only took one photo of the beginning stages , and had already added the black modelling paste through the stencil by then.
the canvas is about 9 1/2 by 11/12 inches and is one of those flat canvas boards (from The Works)
I had added various brown Fresco chalk paints - all kinds of colours, to get some shading I can't remember what colours though now...
once the stencilled windows were in place and thoroughly dry, I added some die-cut bats on black card
I took a Paperartsy stencil for some grassy effects at the bottom. I wanted more texture, so mixed a couple of green Frescos (Wintergreen and something else!) with some matt 3d gel
I used a heavy gel glue to fix the bats and left the wings of the larger ones proud of the canvas for more dimension - though you can't really tell from the angle of the photos, sorry!
closer look at the greenery
at the top, I mixed some art stones into some 3d gel coloured with French Roast fresco paint
Now need to find something to fix it to hang up somewhere...
the other project I finished, is the big A4 journal page.
I don't have any pictures (other than the one I shared on Wednesday) of the starting point of this page...
Lots of blue Frescos, stamps (Seth Apter circle-y ones) texture stencilling (originally with heavy gesso, top right, middle left and bottom right) under the Frescos In some of the stencilled circles I have stamped some Prima circle-y stamps and some more stencilled dots
I stamped the Prima girl on some tissue paper and coloured her from behind with Frescos and some butterflies, (also Prima) on white card stock and fussy cut them and painted them
added some splatters in black and white
the sentiments are from Prima too.
I used slightly brighter, translucent shades for the butterflies (Southern Skies and Glass Blue)
I also added some more stencilled circles in a couple of places, using Finnabair's Light Paste, which picks up the colours underneath so it blends in again.
Edit. as prompted by Alison, I am sharing with A Vintage Journey "going round in circles"
Labels:
canvas,
Fresco's,
gels and mediums,
journal,
mixed media,
Prima,
stencils
Wednesday, 11 January 2017
WOYWW 397 - Several WIPs, that's what's on my workdesk!
Welcome to another week's desk sharing and hopping. Head to Julia for the link up as usual - here
Having got ahead of myself over New Year with a heap of January birthday cards, I had some time to play at the weekend... I find myself with 4 WIPS (work in progress) started...
to the left. my A5 sized journal mop up paint from the blue A4 journal page (right) - it's a combination of Frescos and then some Pebeo shimmery paint mixed with heavy gesso and spread with a palette knife...
the white canvas which is bleached out by the flash, has heavy white gesso stencilled (circles) and some Fresco blue stencilled circles and is probably going to be "Finnabair'd" The flourish is the die I showed a week or so ago, cut from kraft card that was hanging around.
the blue journal to the right, is more circles stencilled in gesso under various blue Fresco paints, and has stamping in circles too.
The canvas standing at the back is a fabulous Stencil Girl arched window over a background painted of various brown fresco paints. I've done something similar with this stencil before, on a smaller canvas, I just love the gothic look it has.
I tried to get a better photo, so changed the canvases about a bit, I think the texture on the white one shows up a little more in this version.
the window canvas has greenery at the front, using a Paperartsy stencil with matte gel mixed with some green fresco paint. the bats are die cut (memory box)
So, 4 pieces on the go, none finished.. although the window one is nearly there, I think! Watch this space for more details maybe by next week.
I really had fun with all of these, it's been ages since I had a really good play, and it was fun to do so any different things at the same time. Apart from the gothic window, I didn't know what I was going to do with any of them till I started.
I've managed to catch the cold that is going round the office, which is a pain, but at the moment it isn't too bad...so I'll scurry off to avoid sharing my germs with any of you...
Having got ahead of myself over New Year with a heap of January birthday cards, I had some time to play at the weekend... I find myself with 4 WIPS (work in progress) started...
to the left. my A5 sized journal mop up paint from the blue A4 journal page (right) - it's a combination of Frescos and then some Pebeo shimmery paint mixed with heavy gesso and spread with a palette knife...
the white canvas which is bleached out by the flash, has heavy white gesso stencilled (circles) and some Fresco blue stencilled circles and is probably going to be "Finnabair'd" The flourish is the die I showed a week or so ago, cut from kraft card that was hanging around.
the blue journal to the right, is more circles stencilled in gesso under various blue Fresco paints, and has stamping in circles too.
The canvas standing at the back is a fabulous Stencil Girl arched window over a background painted of various brown fresco paints. I've done something similar with this stencil before, on a smaller canvas, I just love the gothic look it has.
I tried to get a better photo, so changed the canvases about a bit, I think the texture on the white one shows up a little more in this version.
the window canvas has greenery at the front, using a Paperartsy stencil with matte gel mixed with some green fresco paint. the bats are die cut (memory box)
So, 4 pieces on the go, none finished.. although the window one is nearly there, I think! Watch this space for more details maybe by next week.
I really had fun with all of these, it's been ages since I had a really good play, and it was fun to do so any different things at the same time. Apart from the gothic window, I didn't know what I was going to do with any of them till I started.
I've managed to catch the cold that is going round the office, which is a pain, but at the moment it isn't too bad...so I'll scurry off to avoid sharing my germs with any of you...
Labels:
canvas,
frescos,
gels and mediums,
journal,
mixed media,
woyww
Wednesday, 4 January 2017
WOYWW 396 - Happy New Year!
So, Happy New Year, we made it! All that hard work, shopping and baking (well some of you anyway!) and feasting....Time for the first desk hop of the year... Link up at Julia's as usual...

I forgot to share this pic last week of the last goodies I bought from the Country View Craft advent sale
another couple of dies and a stamp (Seth Apter
there isn't very much on my desk - Tuesday was my first day back at work, and I really didn't make the most of my time off, doing very little crafting - I did get a journal page finished (see the post before this one) - although I did get ahead with my January birthday cards but I can't share them yet!
I did start another journal page.. a mix of frescos, infusions and gesso, some colourburst sprays, and there we stopped....
just in the corner of the picture is a book I purchased from Julie Kirk (notesonpaper) I love her blog, and her style of writing...I am sure some of you know her too. I loved the way it was wrapped up with paper (book pages of course) which of course I have saved!
It's available from her Etsy shop - snipped tales is a great title for the contents.
needless to say I didn't get any clearing up started either...
so,that's me for the first week of January...
Looking forward to catching up with you all soon.
I'd better go and take the decorations and cards down....
I forgot to share this pic last week of the last goodies I bought from the Country View Craft advent sale
another couple of dies and a stamp (Seth Apter
there isn't very much on my desk - Tuesday was my first day back at work, and I really didn't make the most of my time off, doing very little crafting - I did get a journal page finished (see the post before this one) - although I did get ahead with my January birthday cards but I can't share them yet!
It's available from her Etsy shop - snipped tales is a great title for the contents.
needless to say I didn't get any clearing up started either...
so,that's me for the first week of January...
Looking forward to catching up with you all soon.
I'd better go and take the decorations and cards down....
Subscribe to:
Posts (Atom)