Yesterday was my long awaited (really long awaited, we booked it months ago!) Day Workshop with
Allison Turner in Long Eaton, Nottingham. We were doing a Powertex Tryptych on fence panels.
A very early start (after a traumatic Friday night but never mind that!) saw me leaving for the train to London St Pancras at 6.30 to meet Lin.
Luckily the trains ran on time and Chris met us at the station to take us to Allison's studio. Sadly Emma and Lin R were unable to make this one - we missed you both - but Sam, Lin, Chris Lesley and I had a good old natter..
So, Powertex and fence posts... This is the kind of Powertex project I have been wanting to do ever since we first saw it at the Glasgow SECC the other year... The Angel (
here) was amazing... but this... oh boy.
first step (after tea and coffee!) was to paint the fence panels with gesso
they're about 2 foot long to get an idea..
Sam struggling with the concept of pink gloves... think she abandoned them early on...
I persevered with mine only because I didn't think I'd get my hands clean before the train home!
Chris struggling with the coarse texture of the fence panels, really wanted to sand it smooth...
Once the gesso was dryish, came some stencilling with structure paste - we used the Powertex one, but any firm modelling paste would do..
hard to see the white on white, but it's there.

once the stencilled paste was dry, came some more texture, (3d flexx mixed powertex liquid) , the drippier the better.. but you mix it to the consistency you want. Not too wet or it will fall back in on itself (think very heavy pancake batter)
as you can hopefully see, were working across all 3 at once, for the flow.
Then we add colour (Bister spray)
Chris's looked amazing already - she got some superb stringy drips with hers
my spraying leaves a lot to be desired! I have a love/hate with spray bottles (just ask my rug!)
Just before lunch, we added some more texture, from a large choice (Allison supplied chipboard ones, we took a variety of different embellieshments, Lesley had some Grungeboard numbers and letters... and stuck them on to dry
Lunch time was birthday present opening time, both Lin and Chris had birthdays this week (and Emma on Monday coming)
so there were cards and gifts and of course, cake!
more texture added, with some of our own and Allison's embellishments, torn cardboard...
those of you who've worked with Powertex know how messy it is, so to keep taking a glove off and trying to get it back on again for lots of step by step pictures was tricky!
but I do, just for you... and my record of course!
Lesley (sitting) Sam and Lin, hard at work..
I clambered over some chairs behind Lesley to get a different angle on the day! Sam's boards looking fab.
Emma wanted in progress pics, so we sent her one of Sam taking a WIP of her own boards..
and that seems to be where the photos from the actual workshop end...
we added Bister sprays and lots of other colour sprays too, there is a good squirt of Sunshine Yellow (perfect pearls)
blame the spray colours and the trying to get it dry enough (the thick areas of the 3d Flexx mix take a while to dry, even with a heat gun) for there being no more....
back at home however, I unpacked the boards which had survived the journey (apart from some balls!) and it dried more fully overnight
Time for some finishing touches this morning
Dry brushing... Had my Ivory Powertex bottle been opened since I bought it, I could have used that, instead I used firstly gesso, then White Snowflake Fresco as the gesso wasn't pronounced enough..
anyhow, several layers of dry brushing over the raised areas and the texture on the wood grain...
then to add a bit more colour..
which doesn't quite show up..
I used Treasure Gold, in ruby, emerald and white fire... you can't really buff it though over the coarse texture so you'll have to take my word for it, that it is there
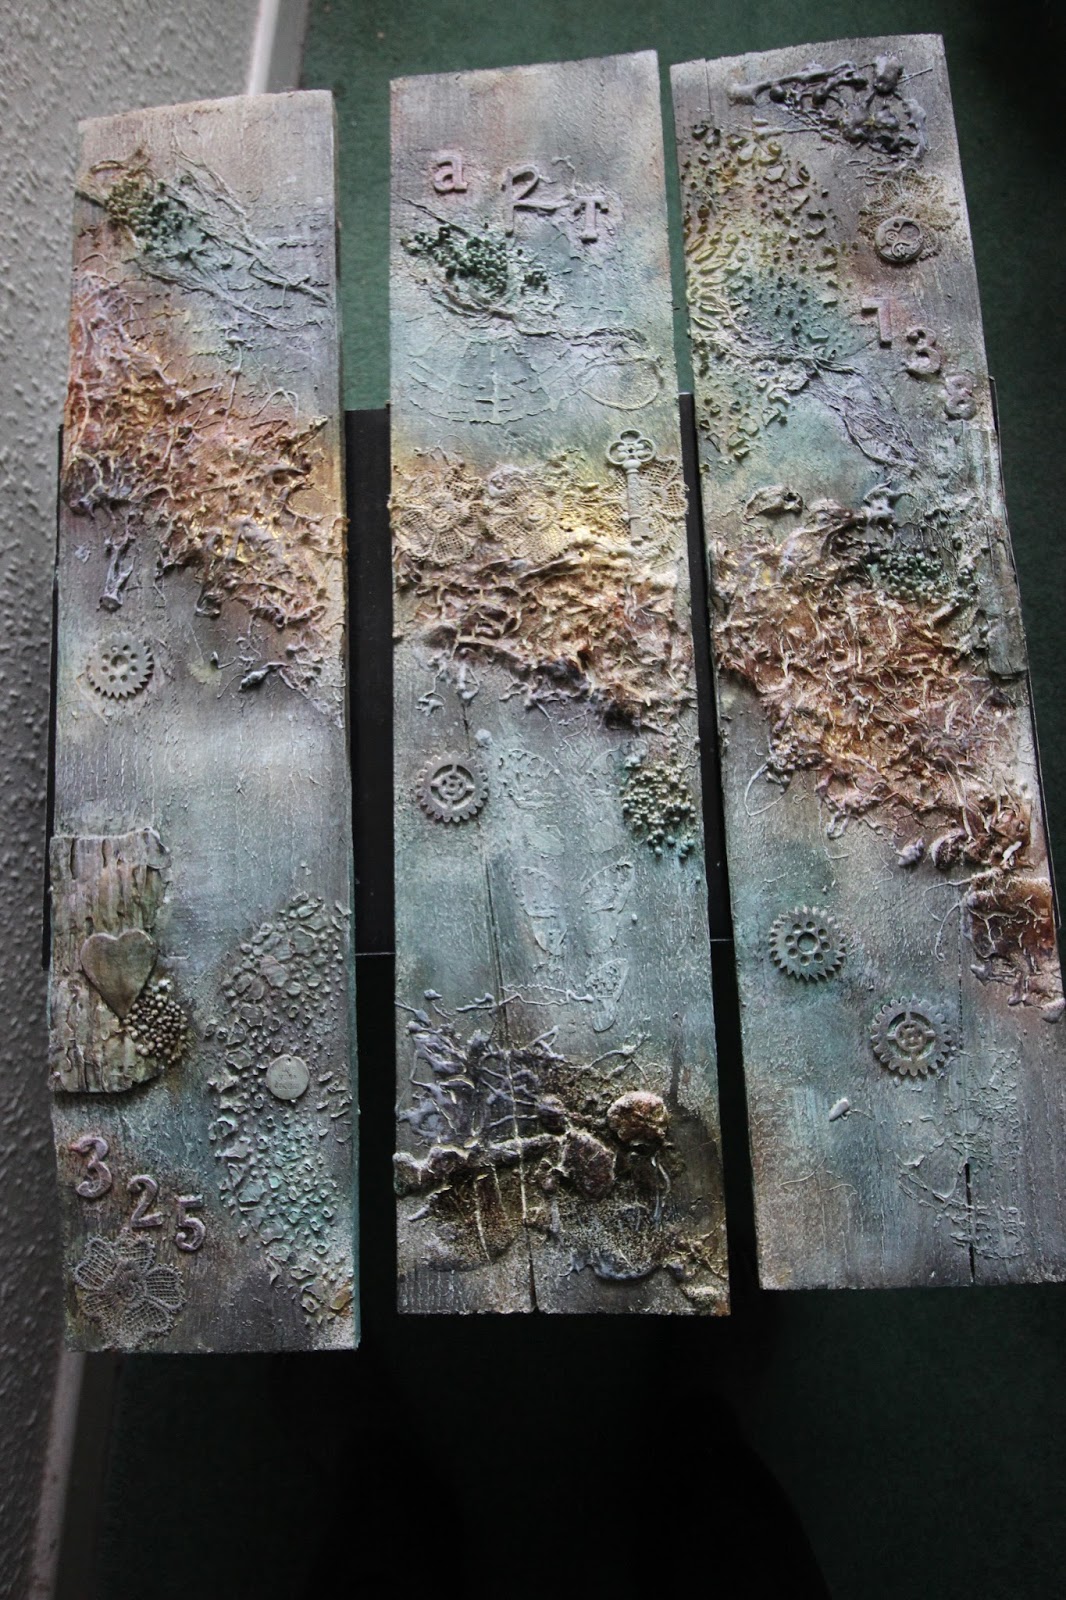
out into the hall to get some photos of them all side by side..
and some close ups
the flower in the corner is from a piece of lace flower trim I got super cheap in The Works...
three together squished into the paste mix under the key...
loving the clumps of stone art balls in the drips too... these balls kept falling off and I lost some more on the way home, but not too many.
the dry brushing has brought out the stencilling (here on the butterflies)
What a great workshop - lovely to see Sam, Lin, Lesley and Chris again, Allison we thank you once again for your tutorship and your time. Emma and Lin R, hope you can make the next one!
Now to find somewhere to hang them (and somehow to hang them...!)